
Quests
A Quest turns real-world and online activity into progress a fan can see and keep. Rather than a one-off interaction, it gives fans a set of steps to complete, like checking in, playing a game, making a purchase, attending an event, or joining a stream, each rewarding XP and achievements that build a persistent character and Trophy Case. It solves a problem every game store, publisher, and convention runs into: engagement that ends the moment the interaction does. A great demo or a busy con weekend creates a spike of attention and then disappears, with no easy way to reward participation, bring people back, or track who actually showed up. Quests replace that with something durable, giving fans a reason to return and level up while giving you a real record of participation.
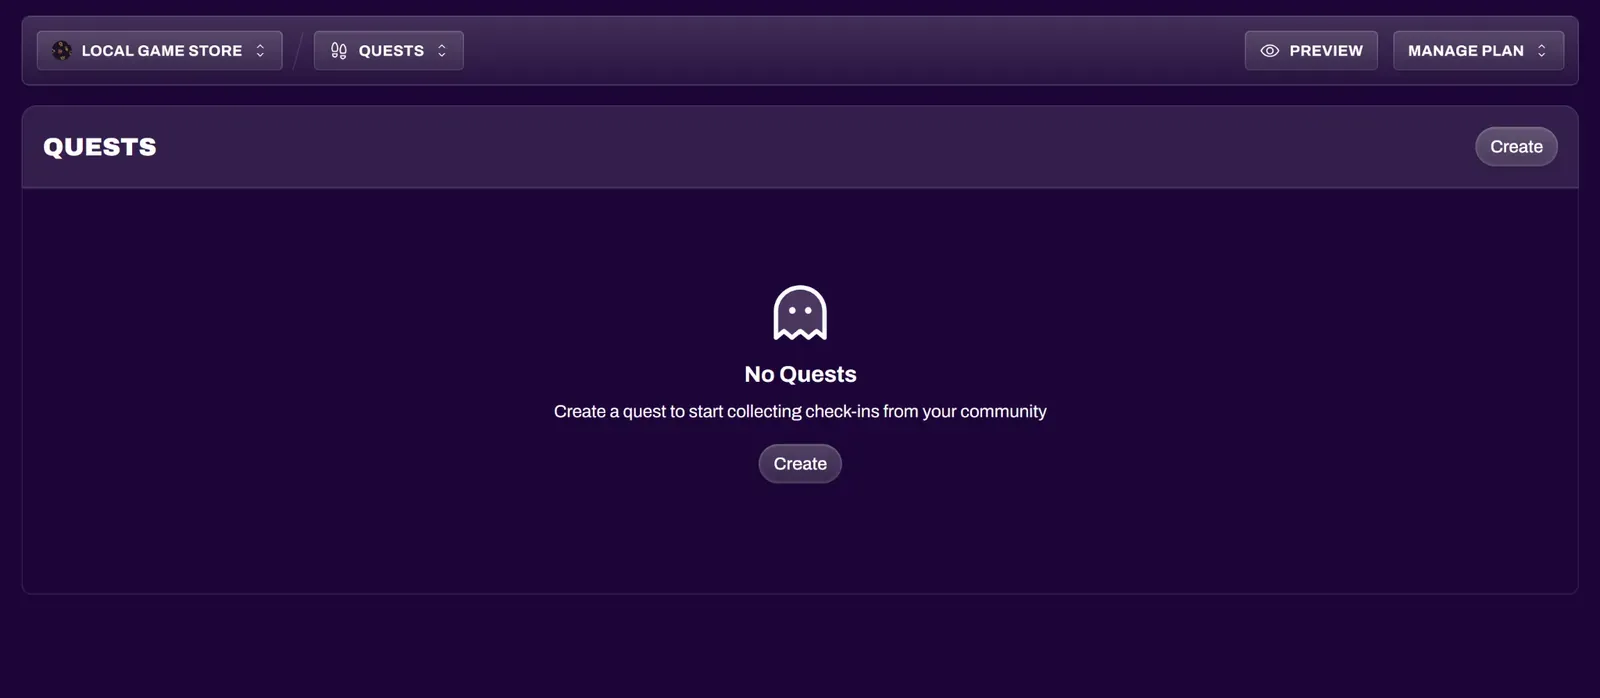
Navigate to the Quests section of your Hub to create a new quest, or edit an existing quest. Quests may be hidden depending on your organization’s pricing plan.
1. Quest Basics
Section titled “1. Quest Basics”Building a Quest takes three steps: Quest Basics, Ways to Earn, and Publish.
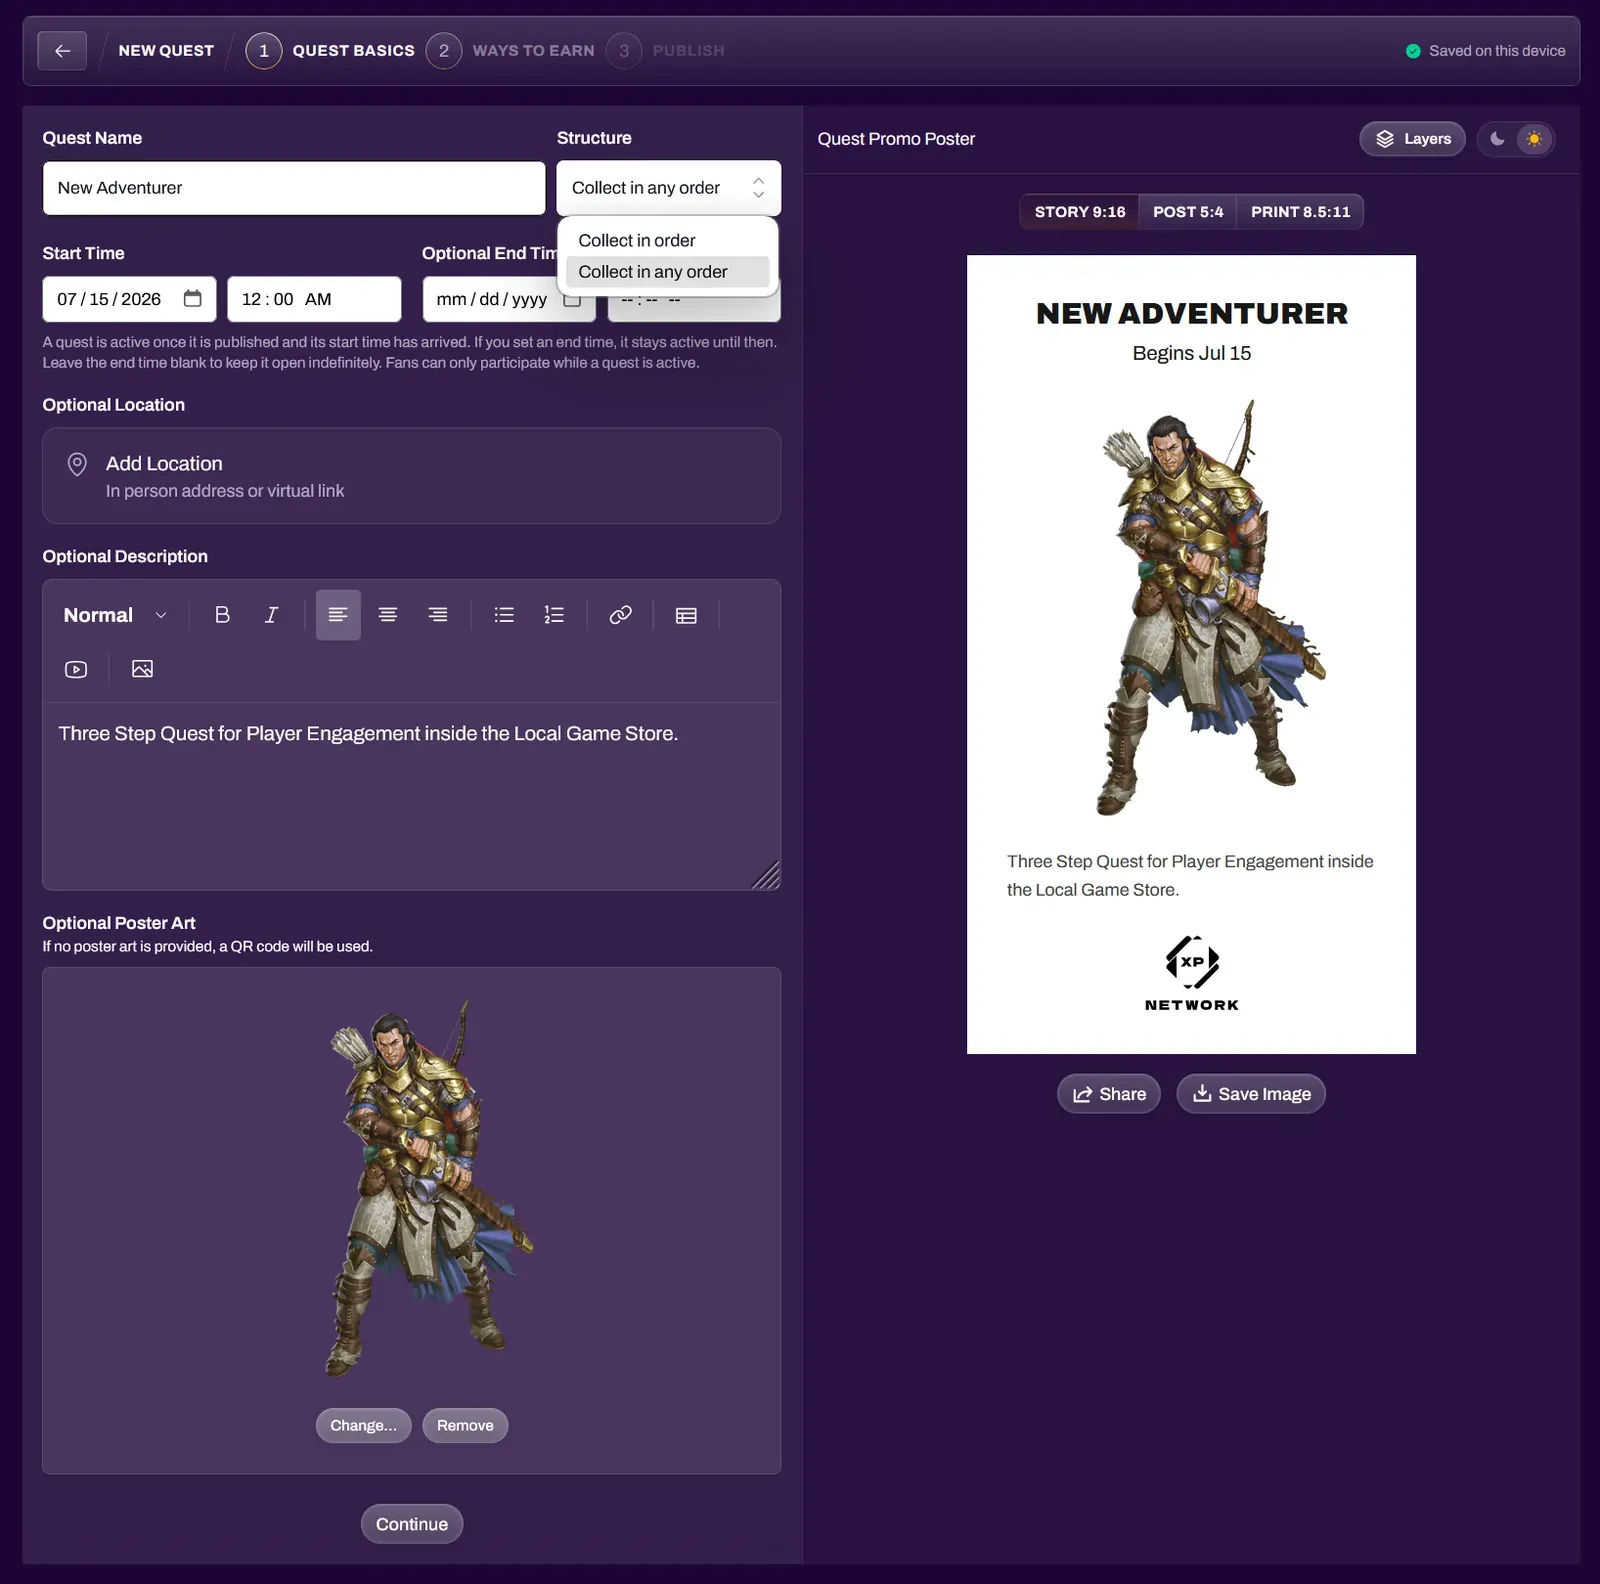
| Field | What it does |
|---|---|
| Quest Name | The title of your Quest, shown to fans and on the promo poster. |
| Structure | Sets whether steps must be completed in sequence or in any order. (See below.) |
| Start Time | The date and time your Quest goes live. A Quest becomes active once it’s published and its start time has arrived. |
| End Time | When the Quest closes. Leave it blank to keep the Quest open indefinitely. Fans can only participate while a Quest is active. |
| Location | An in-person address or a virtual link, if your Quest is tied to a place. |
| Description | A rich-text summary of the Quest. This text also appears on the promo poster. |
| Poster Art | Custom artwork for your Quest. If you don’t provide any, a QR code is used instead. |
Optional fields: End Time, Location, Description, and Poster Art.
As you fill these in, a Quest Promo Poster builds automatically on the right. You can preview it in Story, Post, and Print sizes, hide certain layers if you want, then Share or Save the image to promote your Quest.
Quest Structure
Section titled “Quest Structure”The Structure setting decides the order in which fans complete your Quest’s steps. There are two options:
- Collect in Order — Steps must be done in sequence: step 1, then step 2, then step 3, and so on. Fans can’t jump ahead. Use this when the steps build on each other or tell a story (e.g., check in → play a demo → make a purchase).
- Collect in Any Order — Steps can be completed in whatever order the fan chooses, like catching them however you like. Use this when the steps are independent and order doesn’t matter (e.g., “visit any 5 of these booths”).
Pick the structure that matches how your Quest is meant to flow before moving on.
When your basics are set, select Continue to move to Ways to Earn, where you’ll define the actual steps fans complete.
2. Ways to Earn
Section titled “2. Ways to Earn”This is the second step of building a Quest. Here you define the steps a fan completes to progress, how each step is unlocked, and what it awards.
Working with Steps
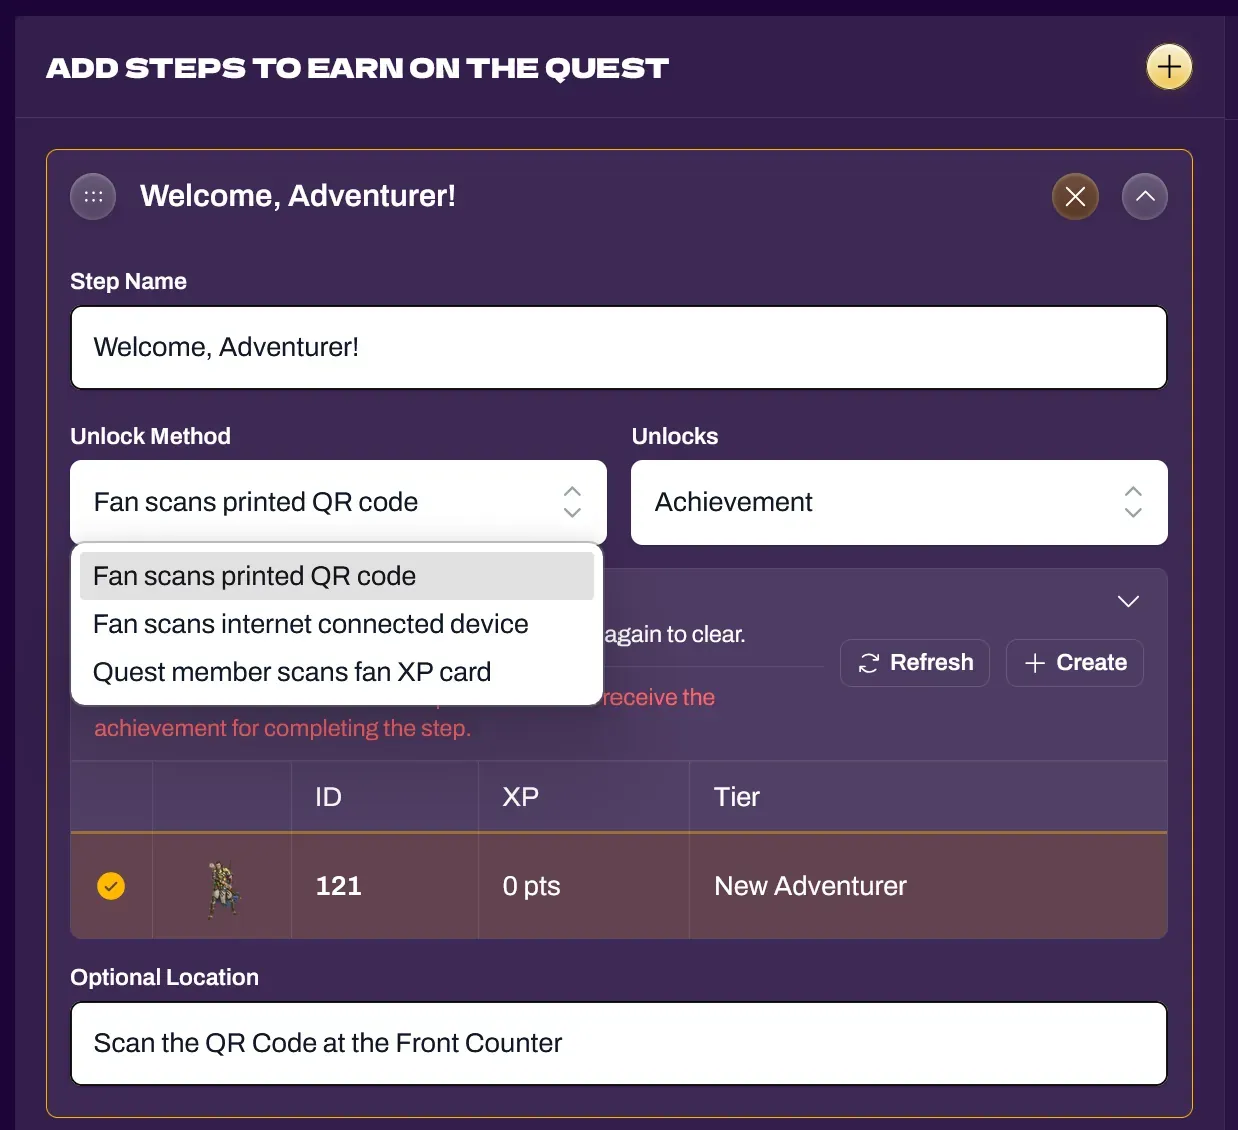
Section titled “Working with Steps”Every Quest must have at least one step. Add more with the + button in the top right of the panel. Each step can be collapsed with the chevron, removed with the ✕, and reordered by dragging its handle (the dotted grid icon on the left).
Each step has these fields:
| Field | What it does |
|---|---|
| Step Name | The title of the step, shown on its scan poster (e.g., “Welcome, Adventurer!”). |
| Unlock Method | How a fan completes the step. (Three options — see below.) |
| Unlocks | What completing the step grants: Achievement or None. |
| Selected Achievements | Appears when Unlocks is set to Achievement — pick the achievement to award. |
| Location | A short instruction shown on the poster (e.g., “Scan the QR Code at the Front Counter”). |
Optional field: Location.
Unlock Methods
Section titled “Unlock Methods”There are three ways a step can be completed. The method you choose determines whether XP can be awarded.
| Unlock Method | How it works | Awards XP? |
|---|---|---|
| Fan Scans Printed QR Code | The fan scans a QR code you printed to complete the step. | No — awards any attached achievement, but no XP. |
| Fan Scans Internet-Connected Device | You display a rotating QR code on a tablet, a stream to a TV, or a livestream overlay. The code rotates every 60 seconds. The fan scans it to complete the step. | Yes |
| Quest Member Scans Fan XP Card | An org member with the Quest Scanner permission uses the built-in Quest Scanner to scan the fan’s XP Card (found in the fan’s profile, or the Scan tab at the bottom of their mobile device). | Yes |
Achievements & XP
Section titled “Achievements & XP”Assigning an achievement is optional — set Unlocks to None for a step that simply needs to be completed with no reward attached.
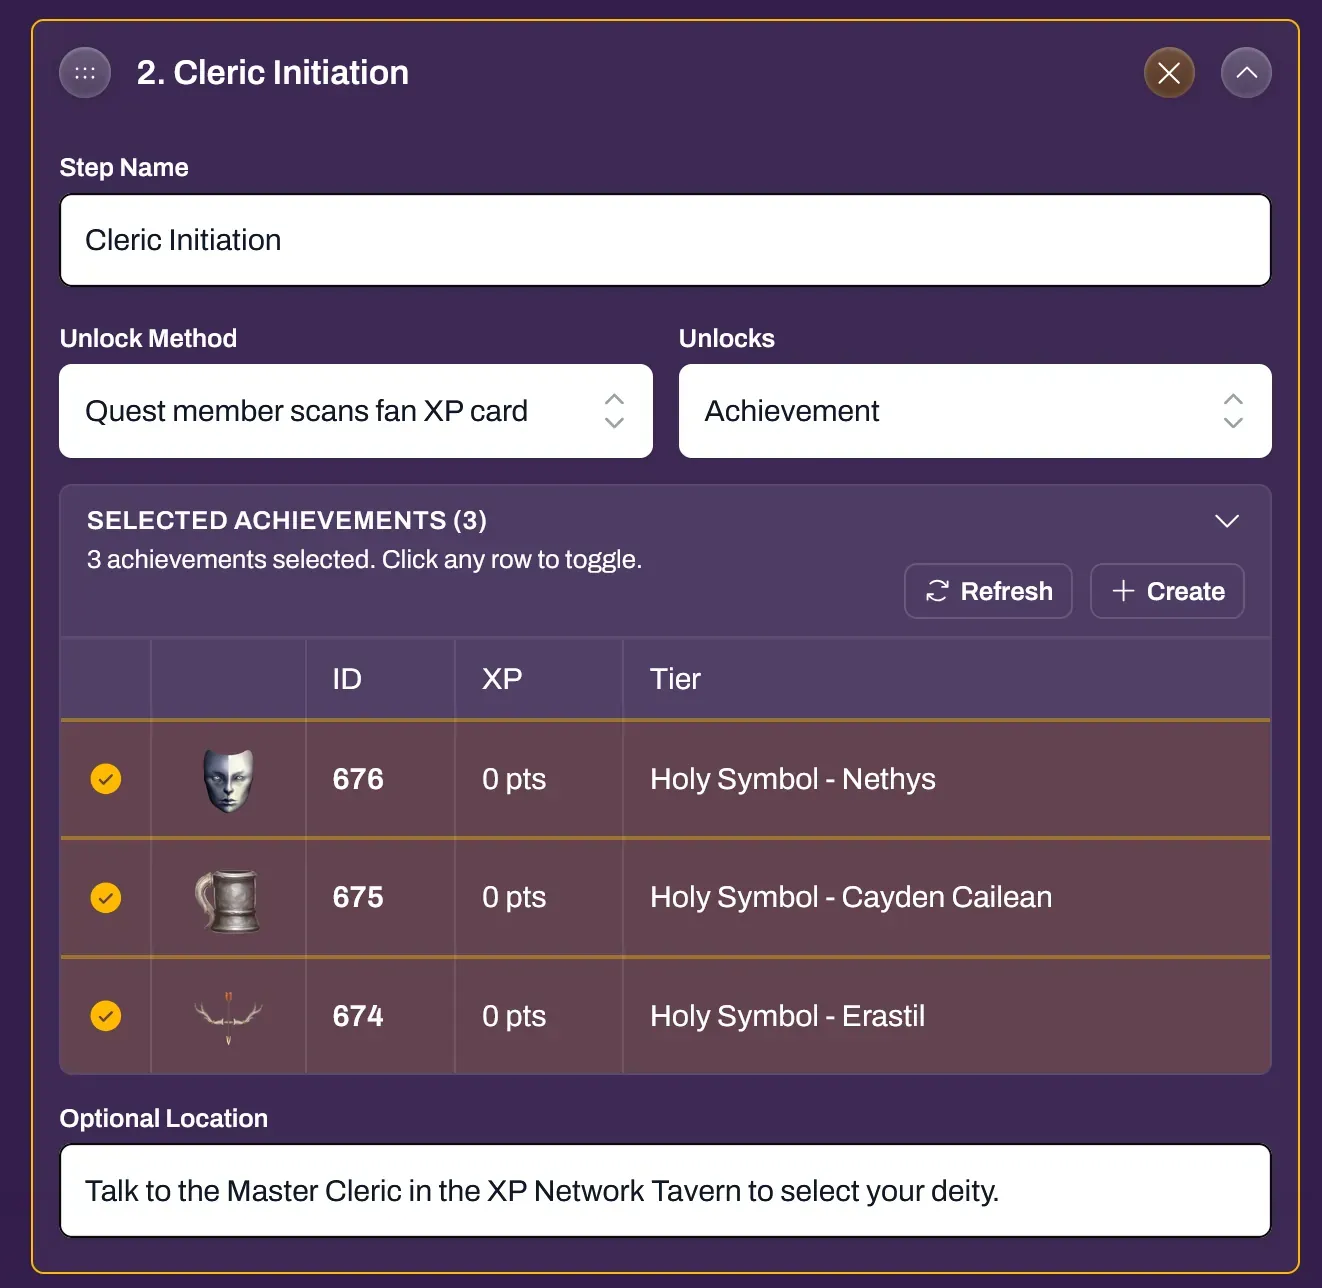
When Unlocks is set to Achievement, the Selected Achievements table appears. Click any row to toggle it on or off.
- You can select one or more achievements for a step. If you select just one, the fan earns that achievement on completion.
- If you select multiple, one is chosen at scan time — this applies to the Quest Member Scans Fan XP Card method: when the Quest Scanner scans the fan’s card, a dropdown lets the scanner pick which of the selected achievements to award.
- Each achievement carries its own XP value and Tier (shown in the table). XP lives on the achievement, not the step.
- Refresh reloads the achievement list; Create makes a new achievement on the spot. Only members with the Treasurer role can create achievements.
The Step’s Scan Poster
Section titled “The Step’s Scan Poster”Each step generates its own poster, previewed on the right, showing the step name and the optional location line. Each Unlock Method produces its own poster, tailored to how that method is completed:
- Fan Scans Printed QR Code — a “Scan to Unlock” poster showing the step’s scannable QR code. The code itself is only generated after you publish the Quest — before that, the preview shows a placeholder.
- Fan Scans Internet-Connected Device — a “Scan a Live Code” poster. Because the code is live and rotating (not printed), the poster instructs the fan to find a device or Quest member showing the code, open the phone camera, and point it at the code to scan.
- Quest Member Scans Fan XP Card — a “Get your XP Card Scanned” poster. Here the fan is scanned rather than scanning, so the poster tells the fan how to present their card: open the XP Network site on their phone while logged in, tap the Scan tab to view their XP card, and hold it up for the organizer to scan.
Preview any poster in Story (9:16), Post (5:4), or Print (8.5:11) sizes.
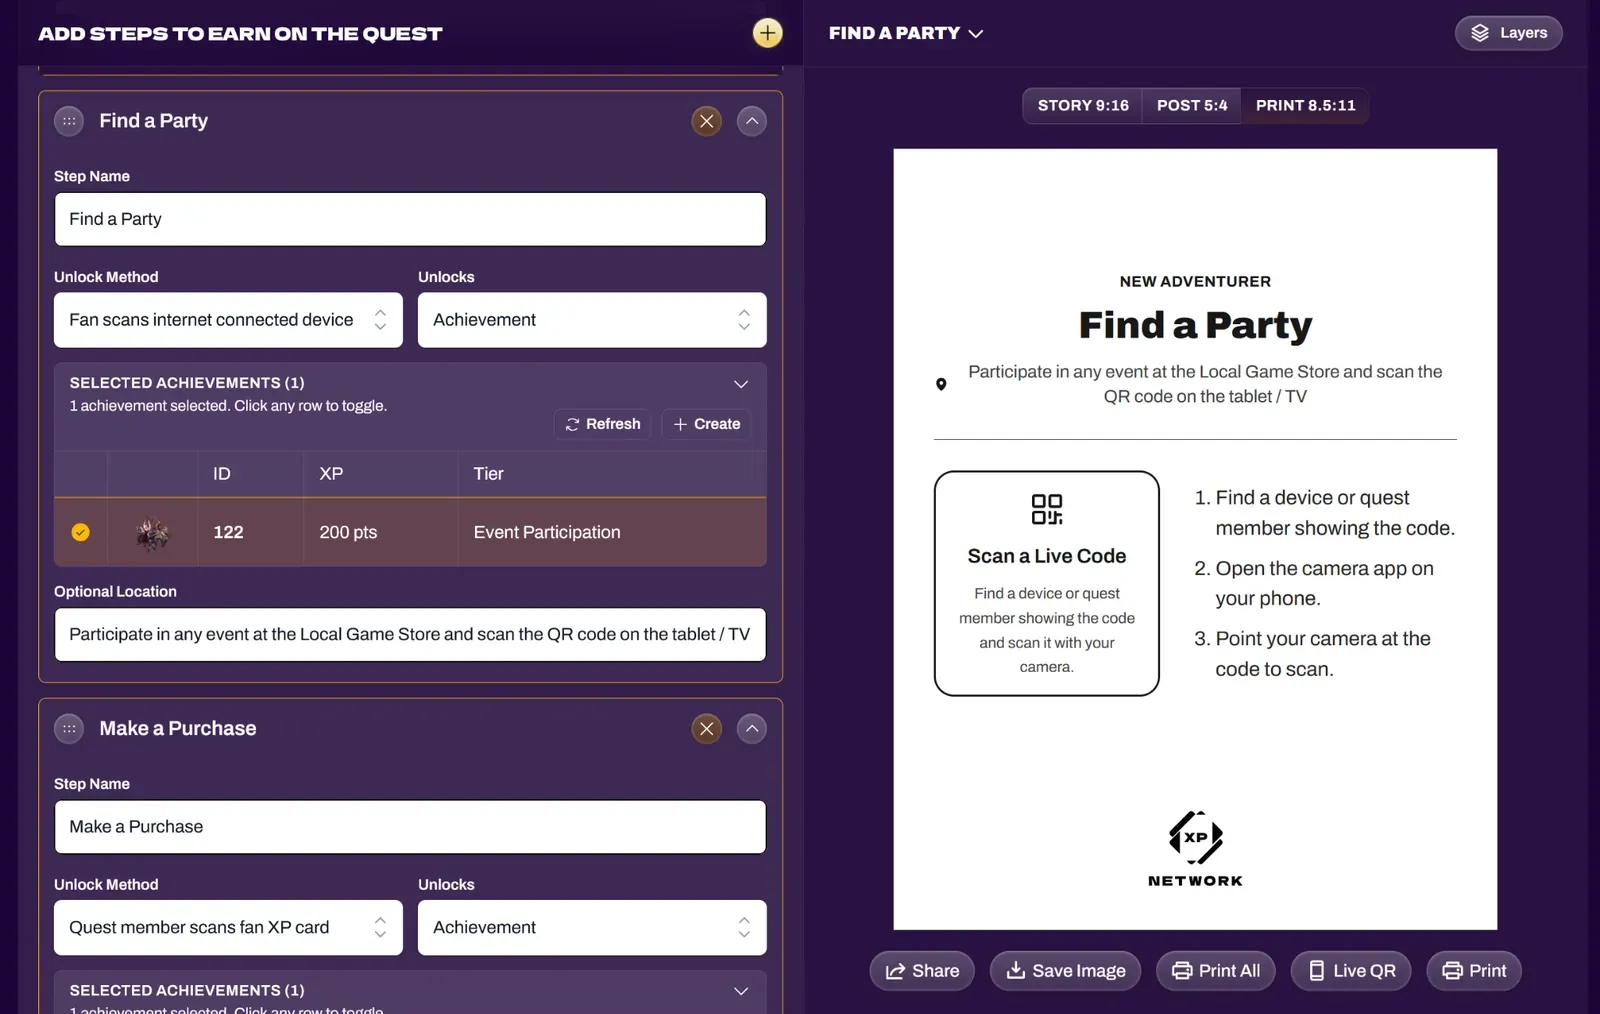
Poster action buttons (bottom right):
- Share — share the poster.
- Save Image — download the poster image.
- Print — print the current step’s poster.
- Print All — print every step’s poster at once.
- Live QR — appears for Internet-Connected Device steps only; opens the Live QR Code dialog (below) to display the live, rotating code.
The Live QR Code Display
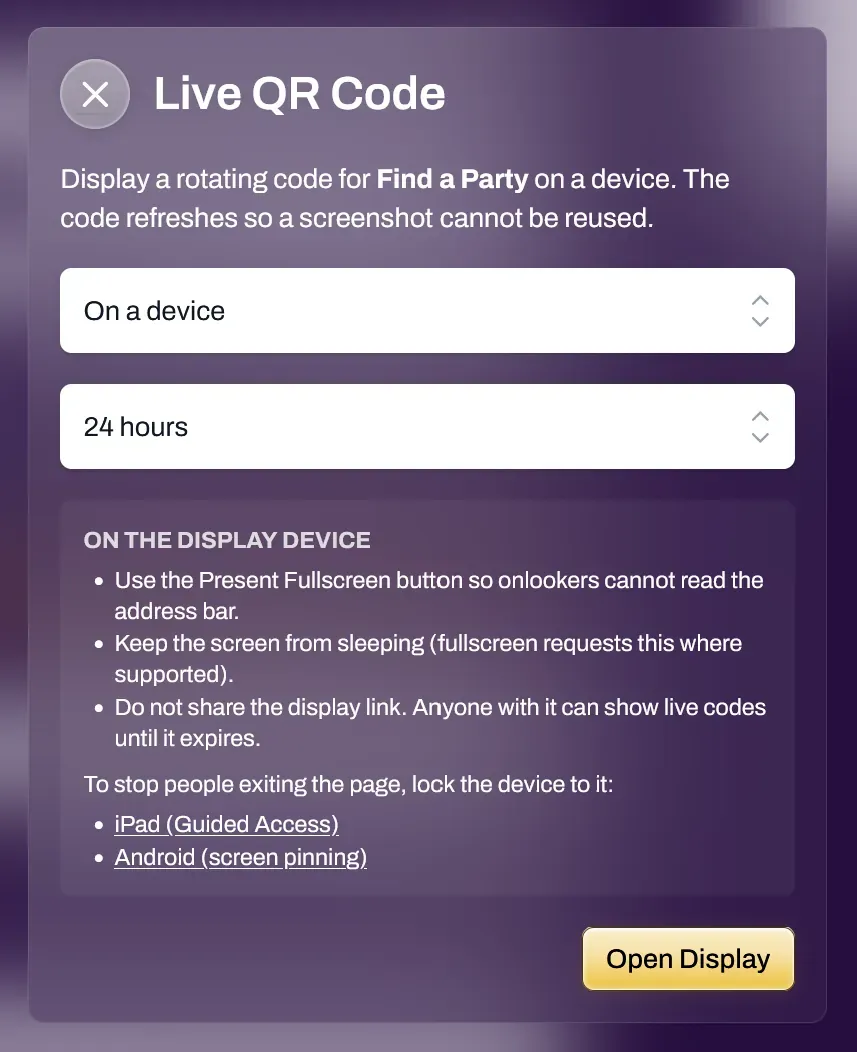
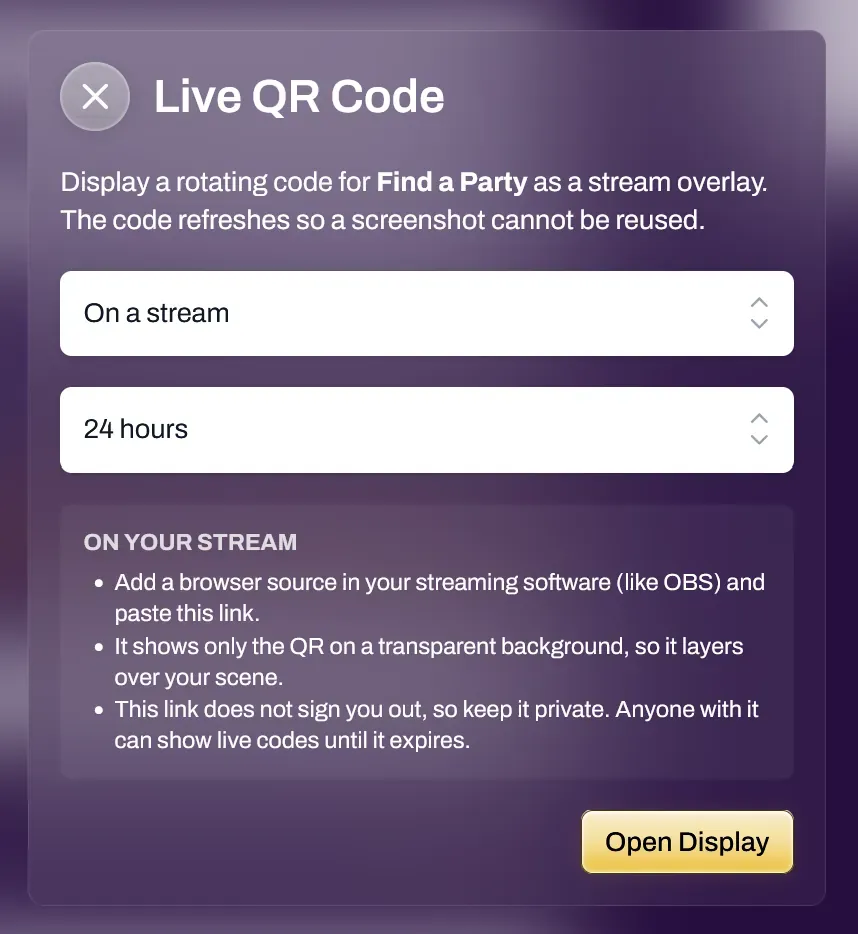
Section titled “The Live QR Code Display”For an Internet-Connected Device step, Live QR opens a dialog that generates a rotating code to display. The code refreshes on its own, so a screenshot can’t be reused to cheat the step. You set two things, then click Open Display:
- Where to display it — choose On a device (a tablet or a screen you point at a TV) or On a stream (a browser source for streaming software).
- How long it stays valid — choose how long the display link keeps generating codes: 8 hours, 12 hours, 24 hours, or Longest possible (28 days). After it expires, the link stops working.
If displaying On a device:
- Use the Present Fullscreen button so onlookers can’t read the address bar.
- Keep the screen from sleeping (fullscreen requests this where supported).
- To stop people from exiting the page, lock the device to it — the dialog links out to iPad (Guided Access) and Android (screen pinning) instructions.
If displaying On a stream:
- Add a browser source in your streaming software (like OBS) and paste the display link.
- It shows only the QR on a transparent background, so it layers cleanly over your scene.
When your steps are set, select Continue to move to Publish.
3. Publish
Section titled “3. Publish”This is the final step. Here you set who can find your Quest, grab its share link, optionally tie it to an event, and either save a draft or publish it live.
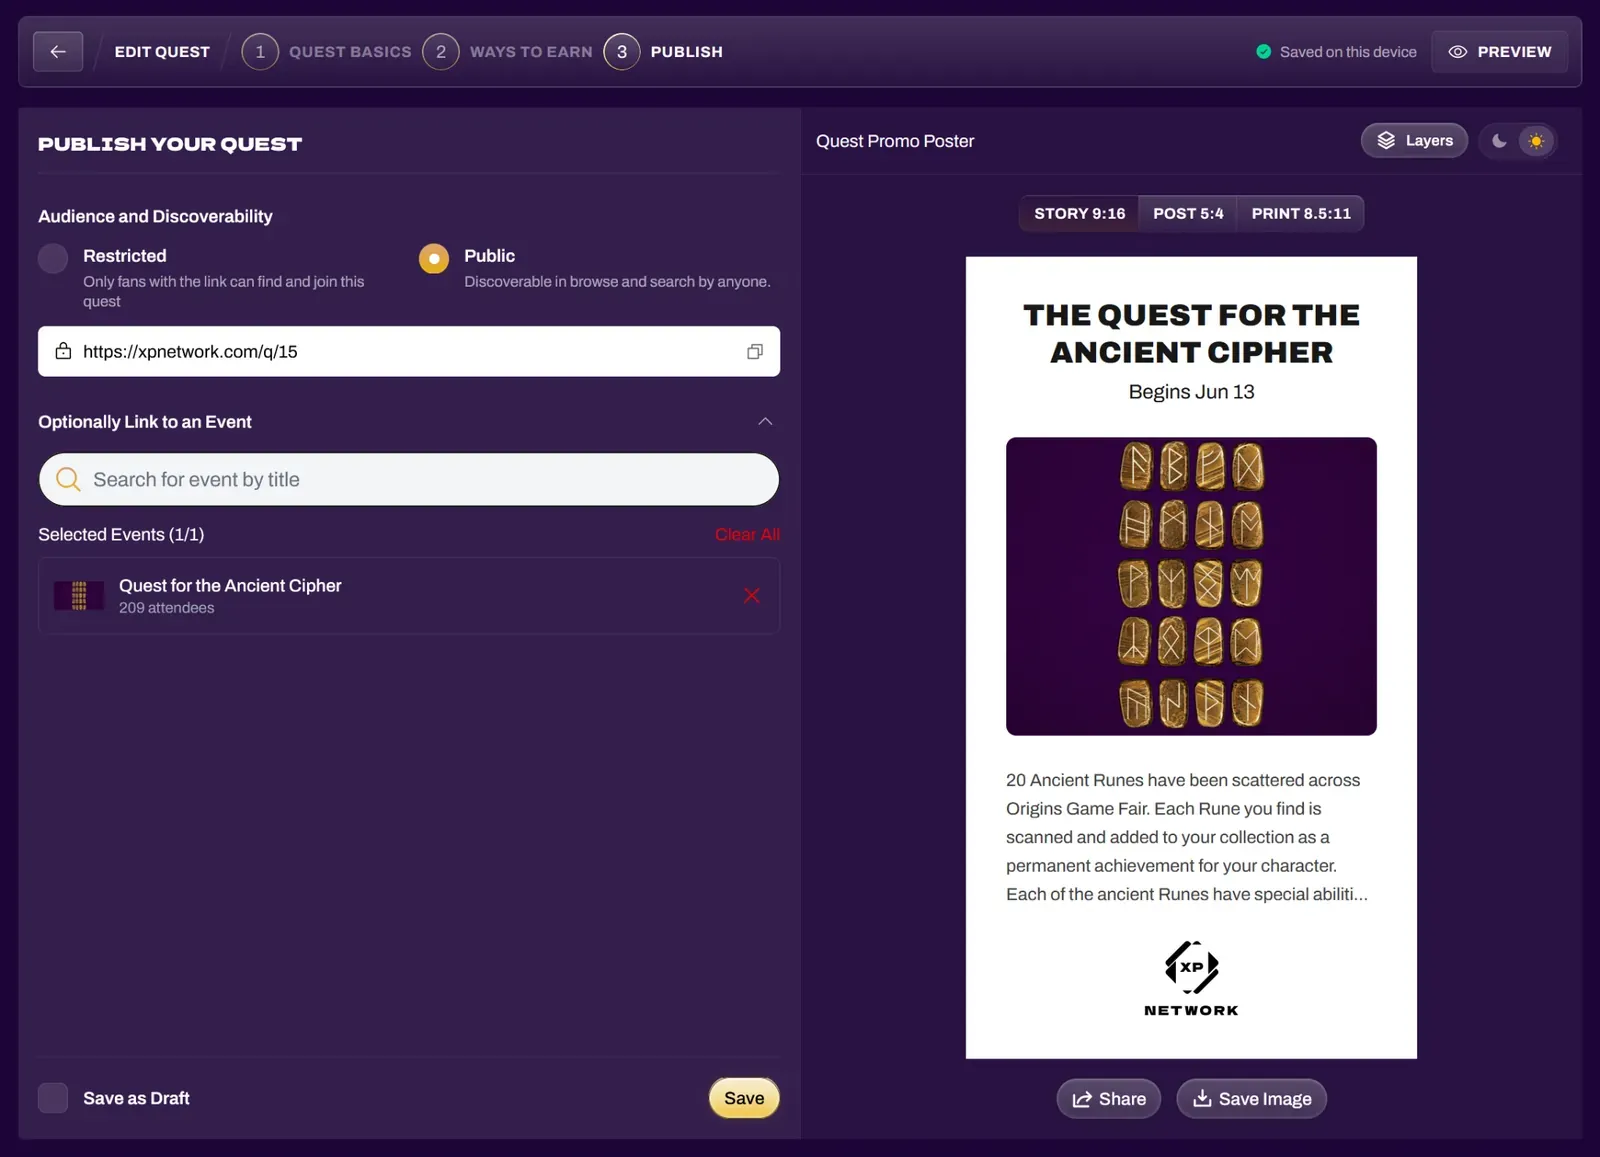
Audience and Discoverability
Section titled “Audience and Discoverability”Choose who can access the Quest:
| Option | What it means |
|---|---|
| Restricted | Only fans with the direct link can find and join the Quest. It won’t appear in browse or search. |
| Public | The Quest is discoverable in browse and search by anyone. |
Below the toggle is the Quest’s share link. Use the copy button to grab it. This is the link you hand out for a Restricted Quest, or share anywhere to promote a Public one.
Link to an Event
Section titled “Link to an Event”Optional
Search for an event by title to associate this Quest with it. This connects the Quest to an existing event on your organization’s calendar. Leave it blank if the Quest isn’t tied to a specific event.
Saving and Publishing
Section titled “Saving and Publishing”The Save as Draft checkbox (bottom left) controls what the Save button does:
- Checked — Save as Draft: Your progress is saved but the Quest is not live. Fans can’t participate yet. Use this to come back and finish later.
- Unchecked: Clicking Save publishes the Quest. A Quest becomes active once it’s published and its start time has arrived, so publishing before the start time simply queues it to go live automatically when that time comes.
Preview Before You Publish
Section titled “Preview Before You Publish”Use the Preview button (top right) at any time to see the Quest as a fan would. The right-hand panel also shows the Quest Promo Poster in Story (9:16), Post (5:4), and Print (8.5:11) sizes, with Share and Save Image buttons and a light/dark toggle for the poster background.
Once published, your Quest is live (or queued for its start time) and fans can begin earning.
4. Scanning & Managing a Live Quest
Section titled “4. Scanning & Managing a Live Quest”Once a Quest is published, you run it from the Hub. This section covers the actions available on each Quest, how to scan a fan’s XP card to complete a step, and how to review scan activity afterward.
Quest Actions
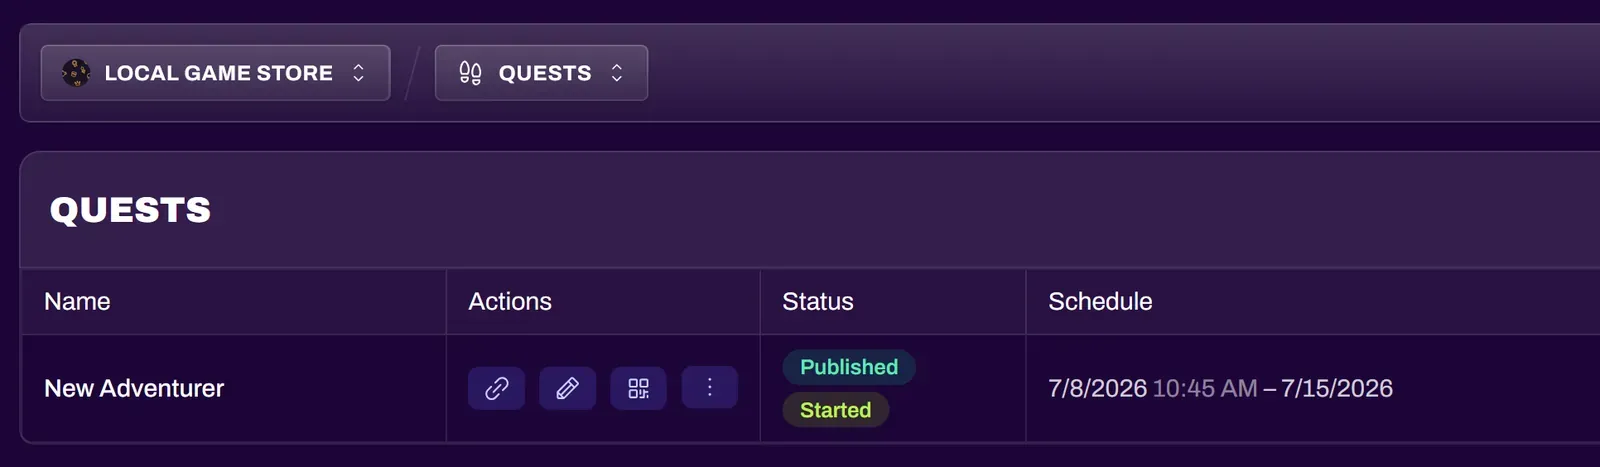
Section titled “Quest Actions”In the Hub, the Quests list shows each Quest with its Name, Actions, and Status (e.g., Published / Started, or Draft / Started). Each Quest row has up to four action buttons:
| Action | Icon | What it does |
|---|---|---|
| Preview Public Page | link | Opens the Quest’s public page exactly as a fan would see it. |
| Edit Quest | pencil | Reopens the three-step editor (Quest Basics → Ways to Earn → Publish). |
| Scan | QR | Opens the Quest Scanner to complete steps for fans in person. |
| More Actions | ⋮ | Additional options, including Scan Logs. |
Access depends on role:
- Quest Organizers have all four actions.
- Quest Scanners have only Preview Public Page and Scan — they cannot edit the Quest or open More Actions.
Scanning a Fan’s XP Card
Section titled “Scanning a Fan’s XP Card”As a Quest Organizer or Quest Scanner, open the scanner from a Quest’s Scan action, then:
- Select the Quest you’re scanning for.
- Select the Unlock Step you want to credit.
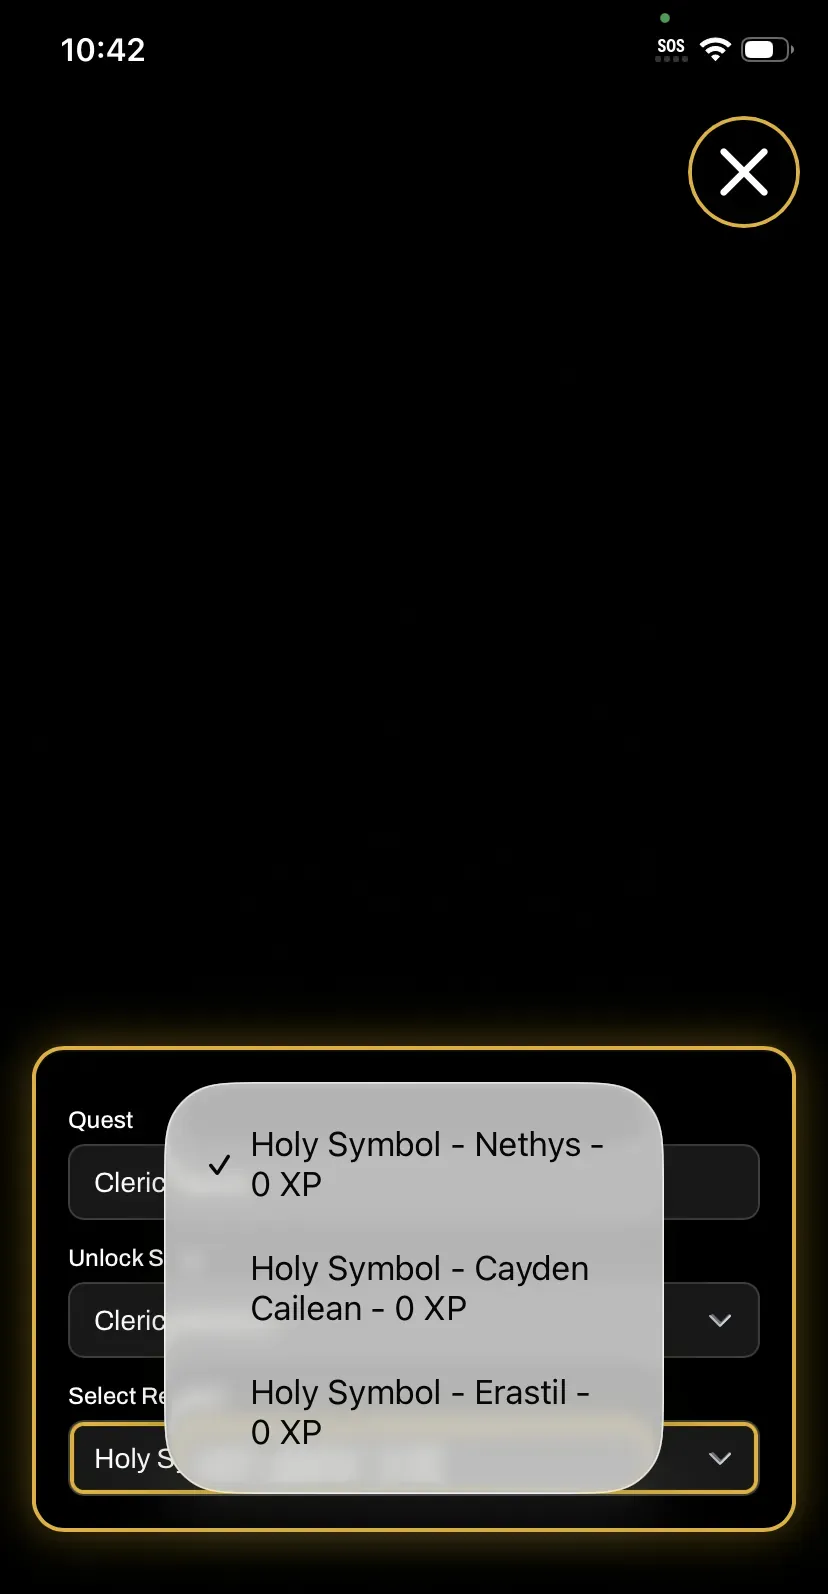
- Select the Reward, if prompted. When the step has more than one achievement attached, a Select Reward dropdown appears so you can choose which one to award. (This is the deity-choice mechanic from the Cleric example: the step offers Holy Symbol – Nethys, Cayden Cailean, or Erastil, and you pick the one the fan swore to.)
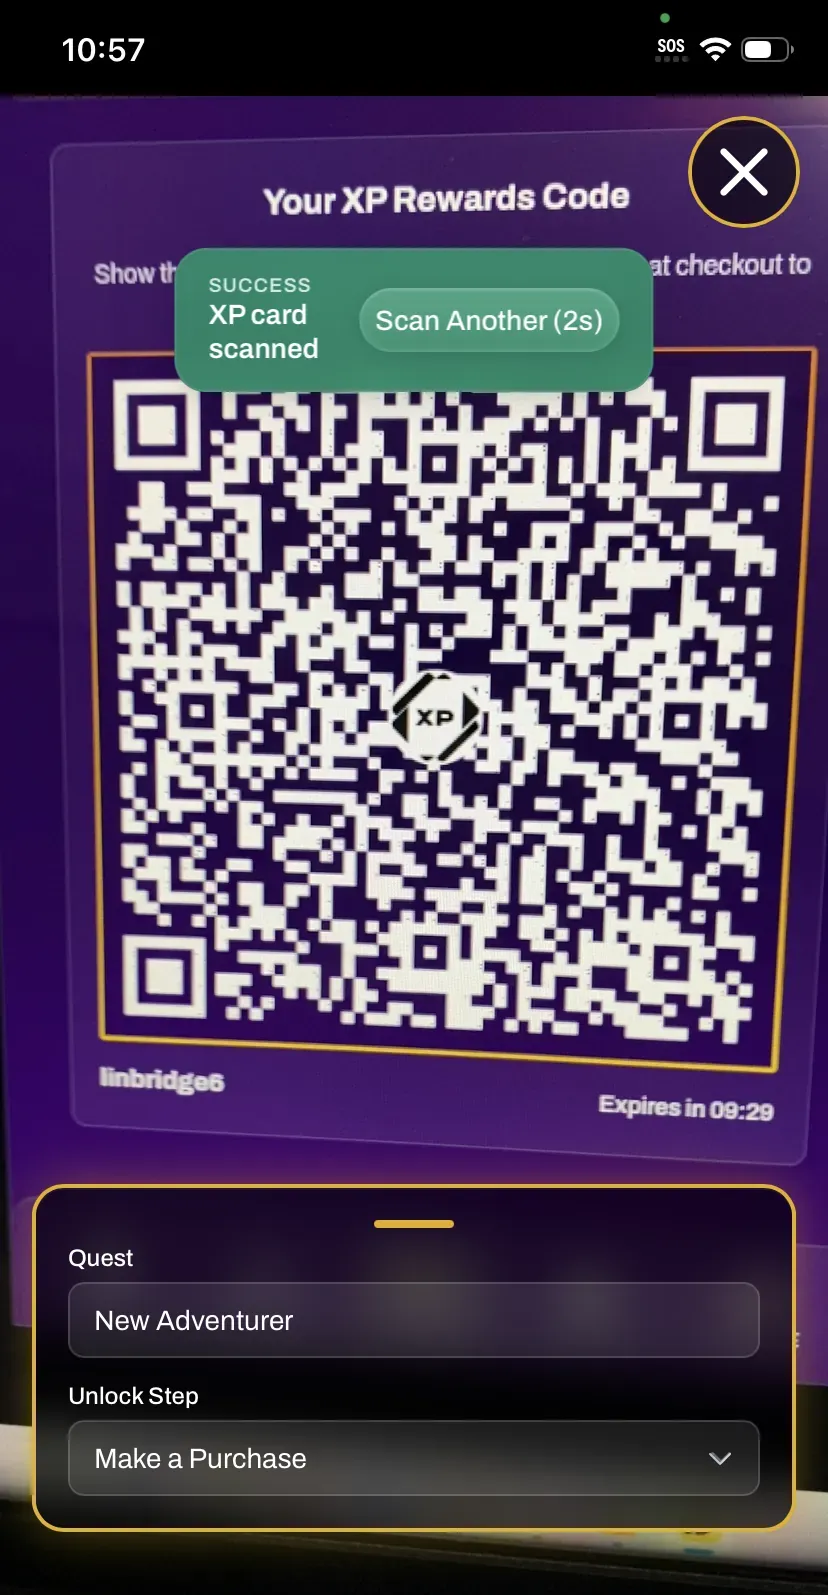
- Scan the fan’s XP card. The fan pulls up their XP card from their profile or the Scan tab on their phone, and holds it up for your camera.
- On a successful read, a green “XP card scanned” confirmation appears, along with a Scan Another button (with a short cooldown) so you can move to the next fan. The scanned user will receive notifications for Quest Step completion and any achievements they unlocked. An error message in red will show if their Quest Step was already completed, or if their XP Card expired (prompting a refresh).
The fan’s XP card is a time-limited, expiring code (it shows a countdown), so a screenshot can’t be saved and reused later.
The Fan’s View
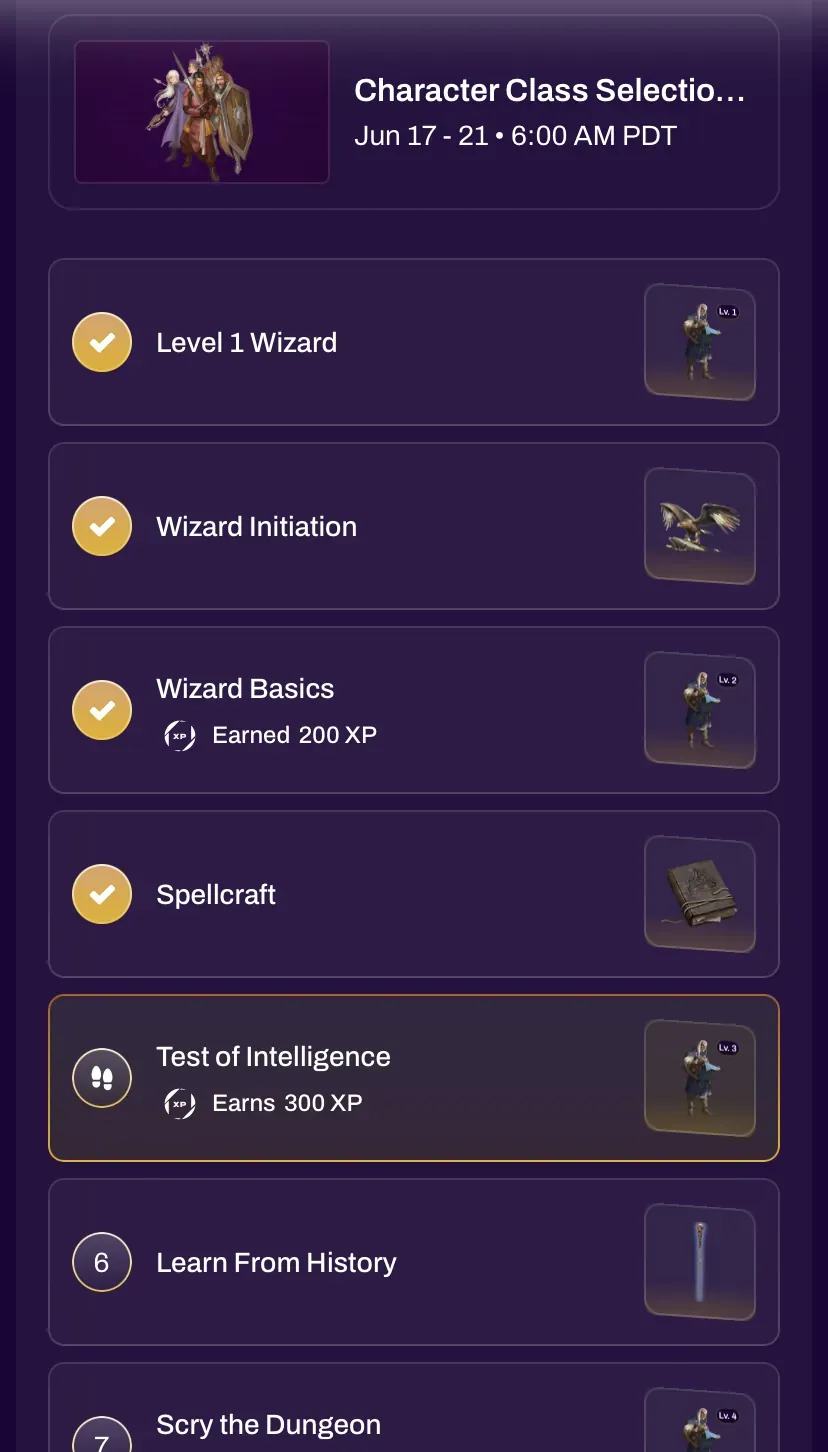
Section titled “The Fan’s View”As fans work through a Quest, they see all of its steps laid out in order along with their own progress. Completed steps are checked off, the current step is highlighted as the one to tackle next, and upcoming steps are numbered so fans always know what’s done, what they’re on, and what’s left to chase. Each step also displays the achievement or reward it unlocks, so fans can see exactly what they’re working toward at every stage of the Quest.
Reviewing Scan Activity (Scan Logs)
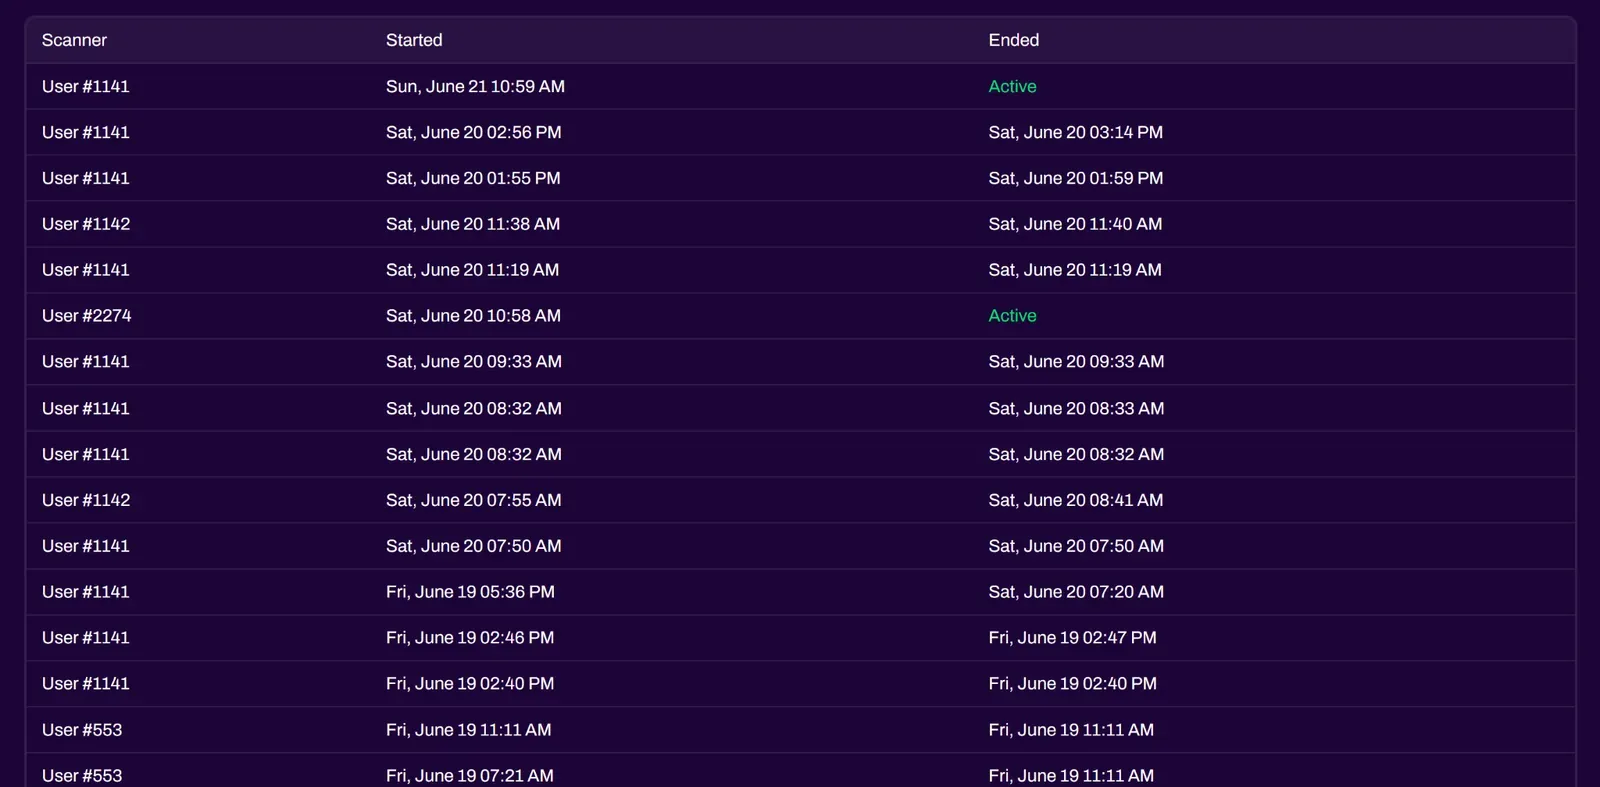
Section titled “Reviewing Scan Activity (Scan Logs)”Organizers can open Scan Logs (shown as “[Quest name]: Scan Sessions”) from the More Actions menu. This is a record of every scan session for the Quest, with columns for:
- Scanner — which staff user did the scanning (by user ID).
- Started — when the scan session began.
- Ended — when it finished, or if it’s still active.
Use this to audit who scanned, when, and for how long — helpful for tracking staff activity and investigating any irregularities. Because Scan Logs live under More Actions, only Quest Organizers can view them; Quest Scanners cannot.
That completes the lifecycle: build the Quest (Basics → Ways to Earn → Publish), then run it live by scanning fans through their steps and reviewing the results.