Running Tournaments
While XP Network is primarily an events and rewards platform, flexible tournament software is available as a feature for events. This section will cover how to set up and run a tournament for a created event.
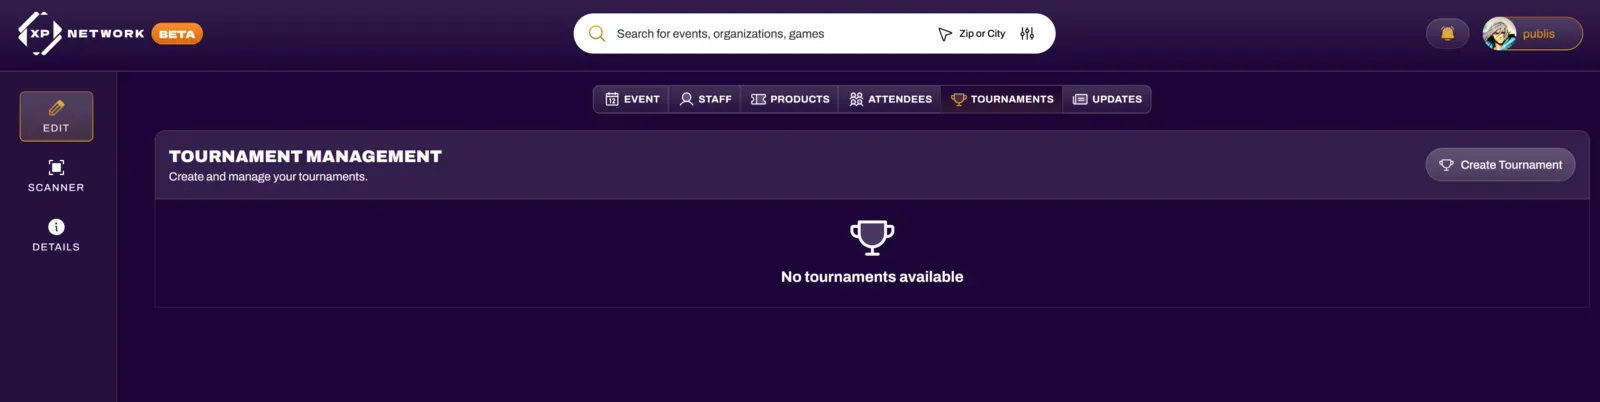
Creating a Tournament
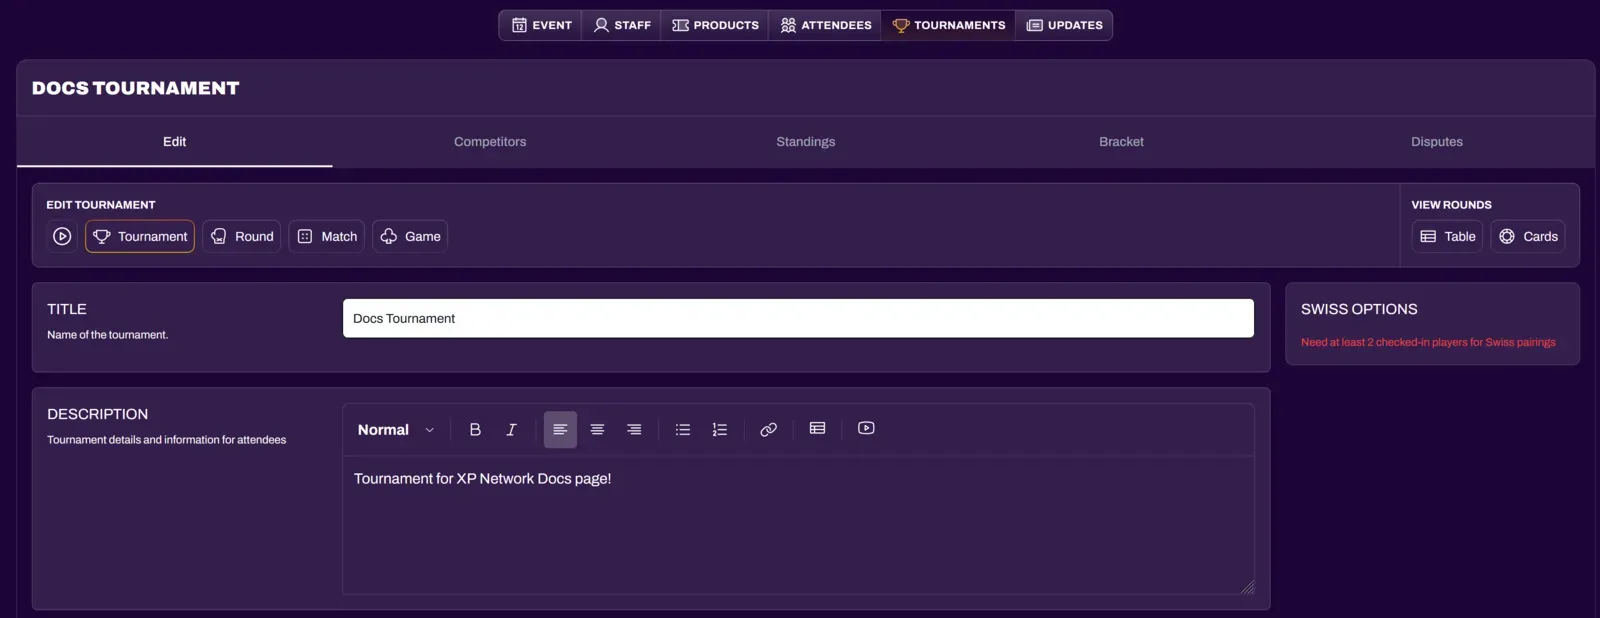
Section titled “Creating a Tournament”After creating an event, go into the Edit menu and navigate to the Tournament tab, then select Create Tournament.
Tournament Options
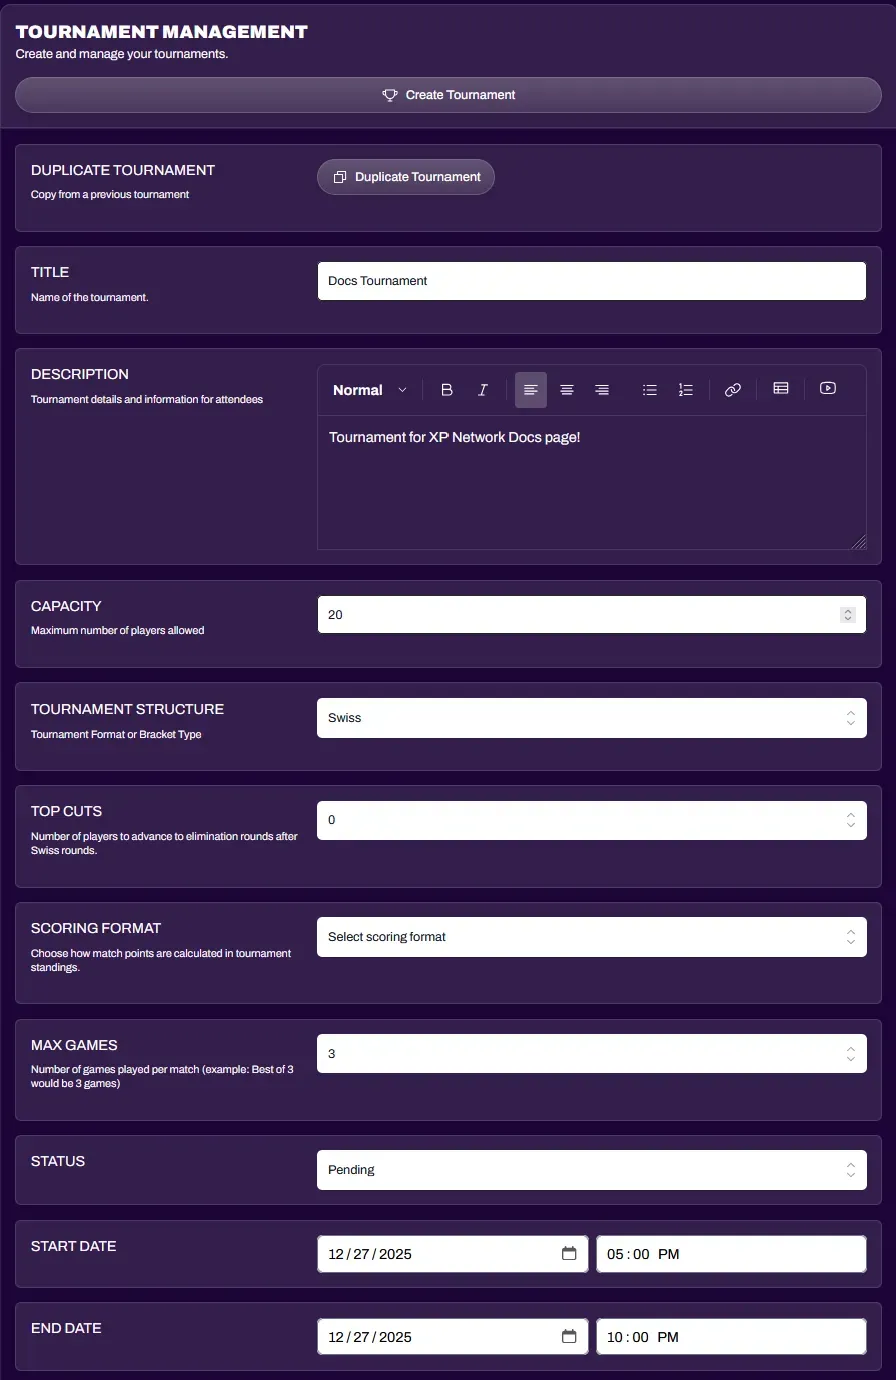
Section titled “Tournament Options”The Title and Description will default to the main event details, but can be modified if the details are different, or in the case of more than 1 tournament in an event.
Capacity is the maximum number of players the tournament can have. This also defaults from the main event details and can be modified.
Tournament Structure: Currently XP Network offers Swiss, Single Elimination, and Double Elimination tournament formats.
Top Cuts: If the tournament structure is Swiss, you can set the number of top cut players to play in an elimination bracket after swiss.
Scoring Format: If the tournament structure is Swiss, you can set the scoring format to Traditional or Best of 2. Traditional is the standard used point system across most games, while Best of 2 is suited for games that support that point system (eg. Alpha Clash).
Max Games: If the Scoring Format is Traditional, you are able to set the number of games per match, anywhere from 1 to 7.
Status: A tournament can have the following tournament statuses - Pending, In Progress, Paused, or Completed. Tournaments should start in Pending and will automatically move to In Progress once started. An event organizer can pause the tournament if necessary, and unpausing it would move the status to In Progress again. Once a tournament has concluded, the status should be set to Completed.
Start Date and End Date: Automatically defaults to the main event Start Date and End Date, but these can be modified if necessary.
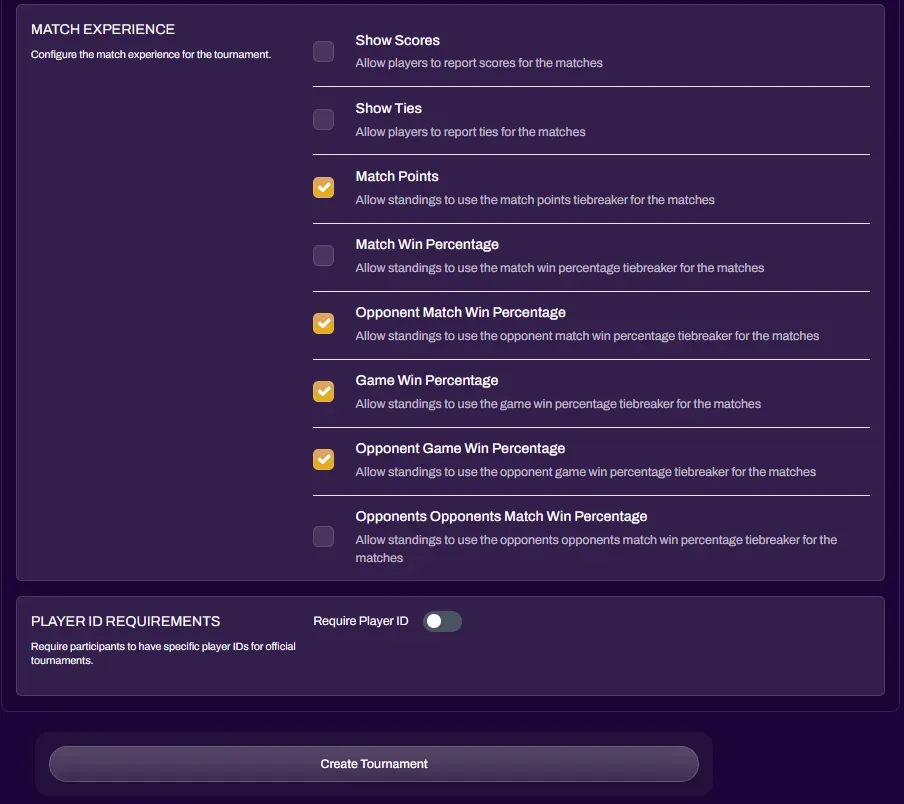
Match Experience: These are tiebreakers that can be toggled to fit a variety of tournament types. The default options ticked are universal tiebreakers for best of 2 games or more. In the case of Best of 1 matches, untick the game win percentage tiebreakers and tick the Opponent’s Opponents Match Win Percentage tiebreaker.
Show Scores: Allows players to input a numerical score while submitting their match.
Show Ties: Allows players to submit an individual game result as a Tie. This option should only be used for tournament structures that allow for individual games to end in ties or no contest.
Match Points: Primary tiebreaker, almost always left on.
Match Win Percentage: Only used in Best of 2 scoring format. Is irrelevant in traditional scoring because every win is 3 points.
Opponent Match Win Percentage: Primary tiebreaker, almost always left on.
Game Win Percentage: Used for matches with Best of 2 or more games. Turn off for Best of 1.
Opponent Game Win Percentage: Used for matches with Best of 2 or more games. Turn off for Best of 1.
Opponents Opponents Match Win Percentage: Secondary tiebreaker for Best of 1 systems. Can be used in Best of 2 or higher, but is generally irrelevant as the primary tiebreakers should be developed enough for this tiebreaker to not matter in those systems.
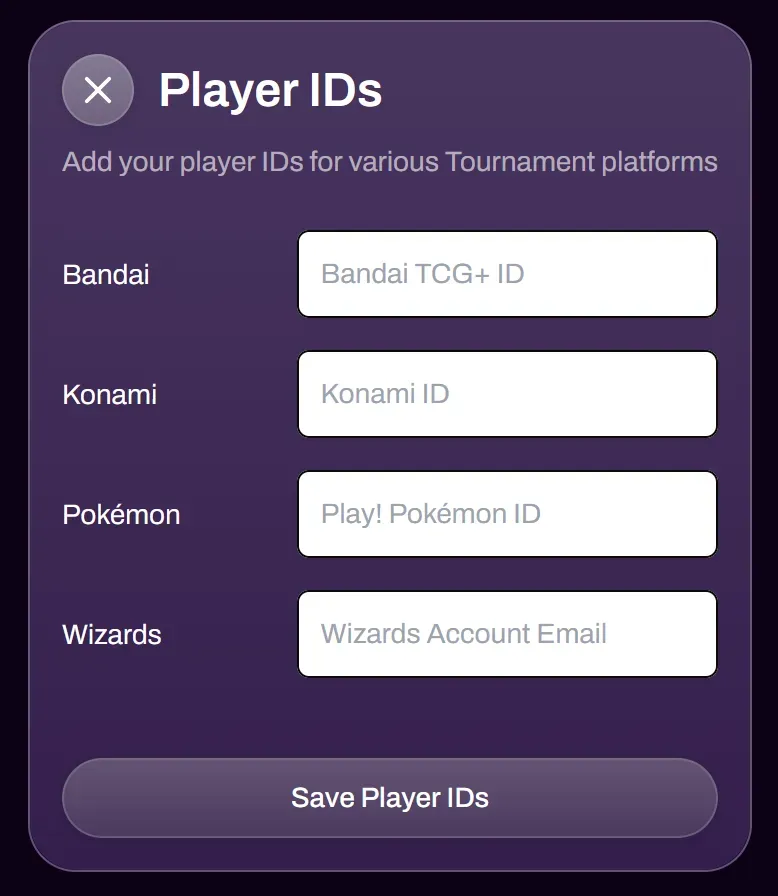
Player ID Requirements: This toggle is only used if the event organizer is using XP Network for ticketing, then exporting the player list to be used with external tournament software. If this toggle is ON, players will be forced to enter their Player ID from whichever external system the event organizer chooses from the dropdown. Players can also edit their external Player IDs from their profile.
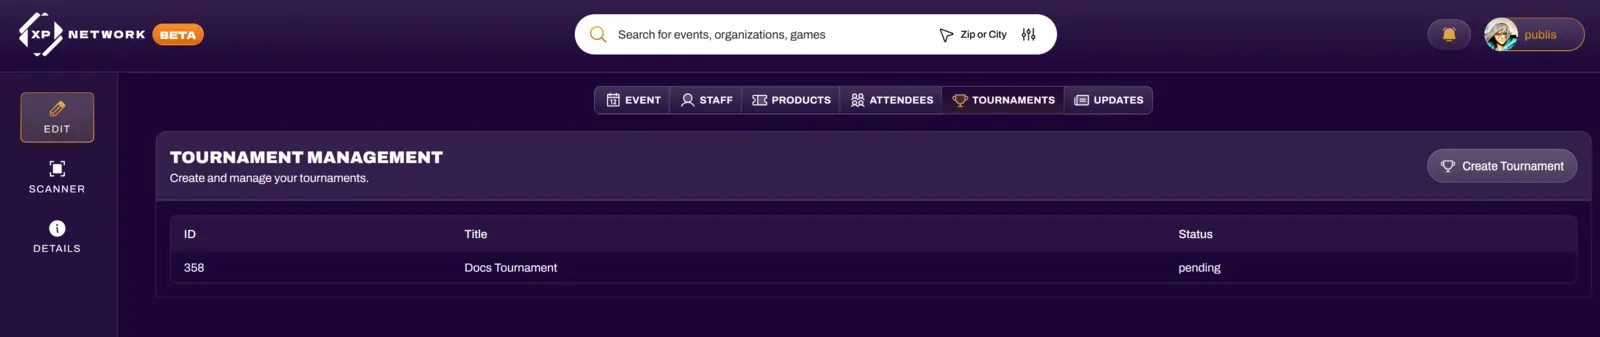
After creating your tournament, it will show up in the Tournaments tab. Selecting the tournament from this view will take you to the tournament organizer view.
Tournament Admission Tickets
Section titled “Tournament Admission Tickets”An event attendee can automatically be assigned to be a Tournament Competitor by purchasing a Tournament Admission Ticket. Navigate to the Products tab and create a ticket, selecting Tournament Admission Ticket from the Ticket Type dropdown.
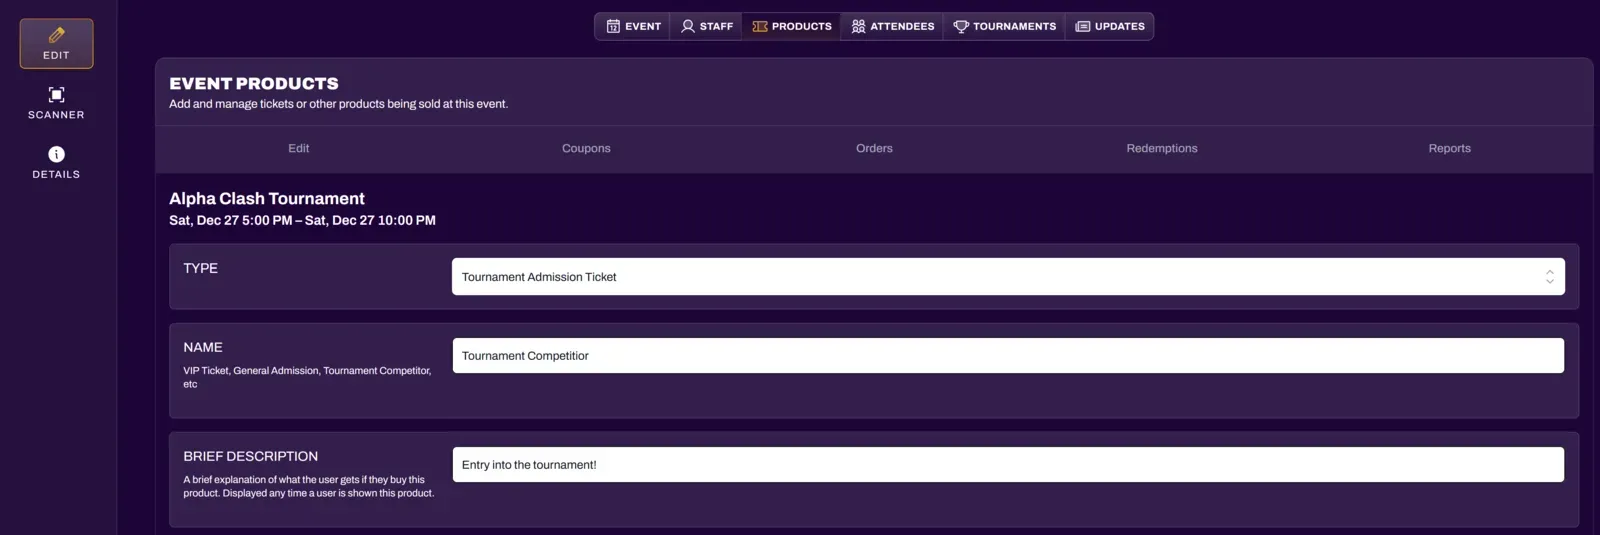
Inventory should be how many tickets to the tournament you want to sell, most likely reflecting the player cap.
Max Quantity will automatically be locked to 1 for Tournament Admission ticket types, since 1 event attendee can only represent themselves 1 time in a single tournament.

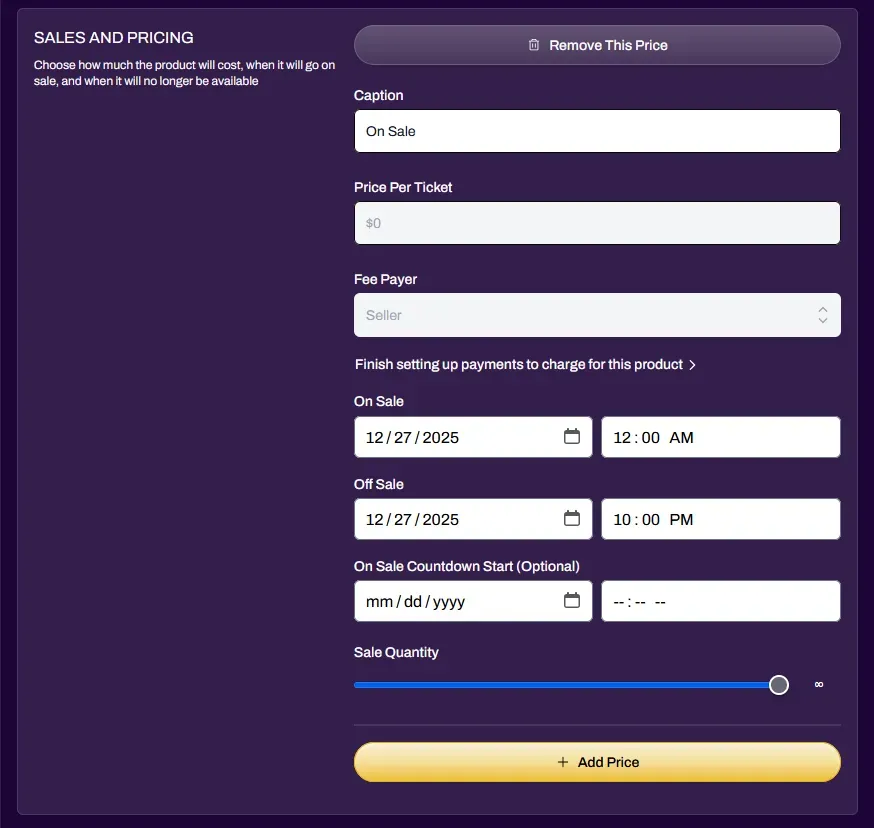
Sales and Pricing works just like a regular Event Admission ticket type.
Price per ticket will automatically be locked to $0 until a Stripe account has been linked. Once active, all ticket proceeds will go to the Stripe account of the associated organization of the event.
Fee Payer is default set to Seller, but you have the ability to change it to Buyer if you wish.
On Sale Date will default automatically to the current date you are creating the ticket.
Off Sale Date will default automatically to the Event End date and time.
Sale Quantity is how many of this ticket you want to sell at the options you have chosen. Defaults to unlimited. This option is useful for dynamic pricing such as “Early Bird Specials” where you can assign a portion of the tickets to be cheaper than the rest.
Grants: The Tournament Admission ticket type allows you to combine Event Admission and Tournament Admission into the same ticket for the event attendee. This makes it easy for them to join the event and also be immediately added as a competitor into the tournament.

Adding Judges to Your Tournament
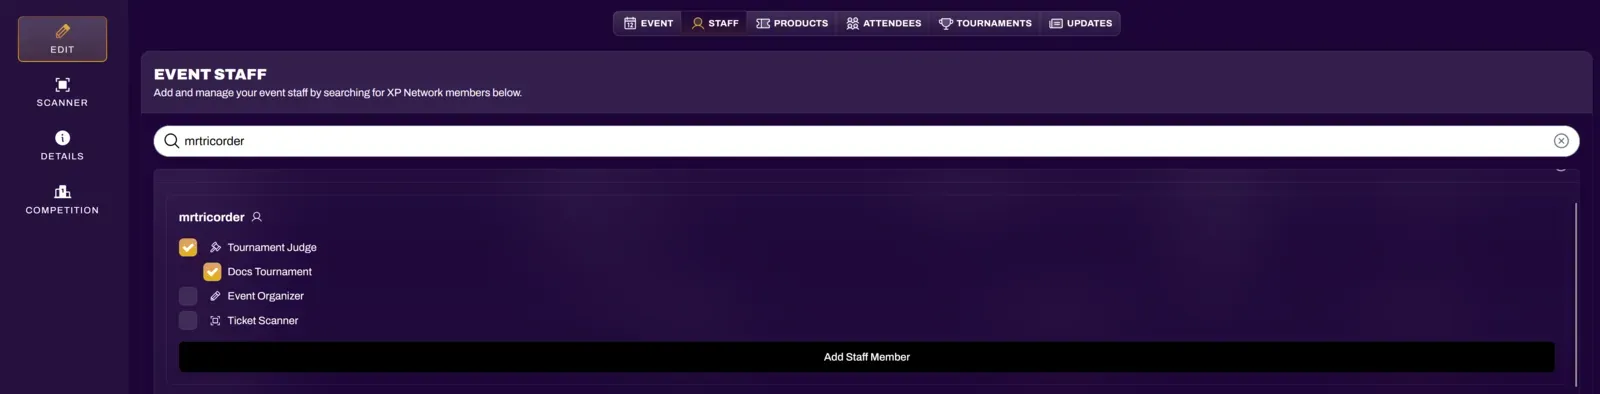
Section titled “Adding Judges to Your Tournament”Under the Staff tab, enter the XP Network username of the Judge you want to add, and assign them the Judge role for any tournaments you want them to judge. This will give them access to the Judge Dashboard (Disputes tab) and will give them notification alerts of any match disputes or judge calls.
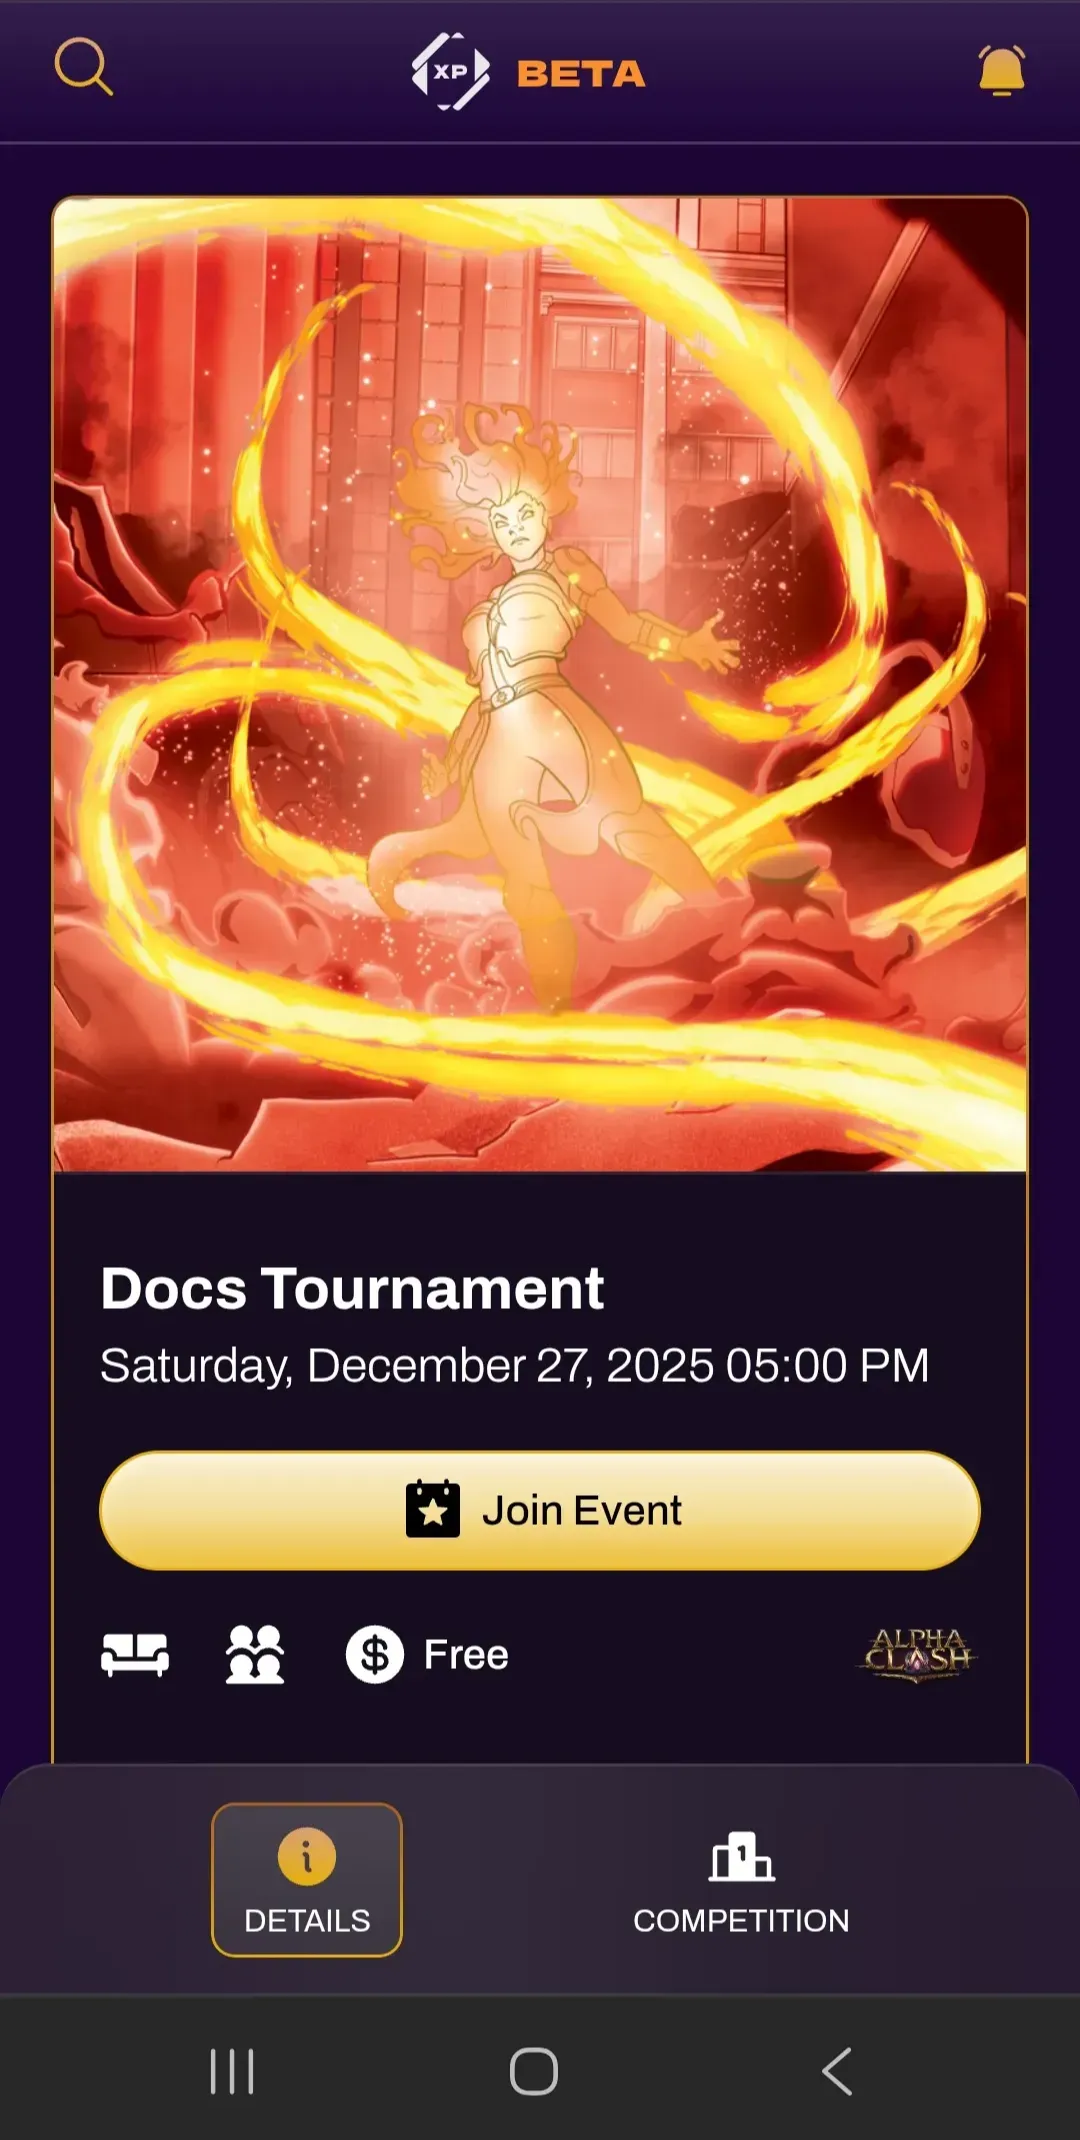
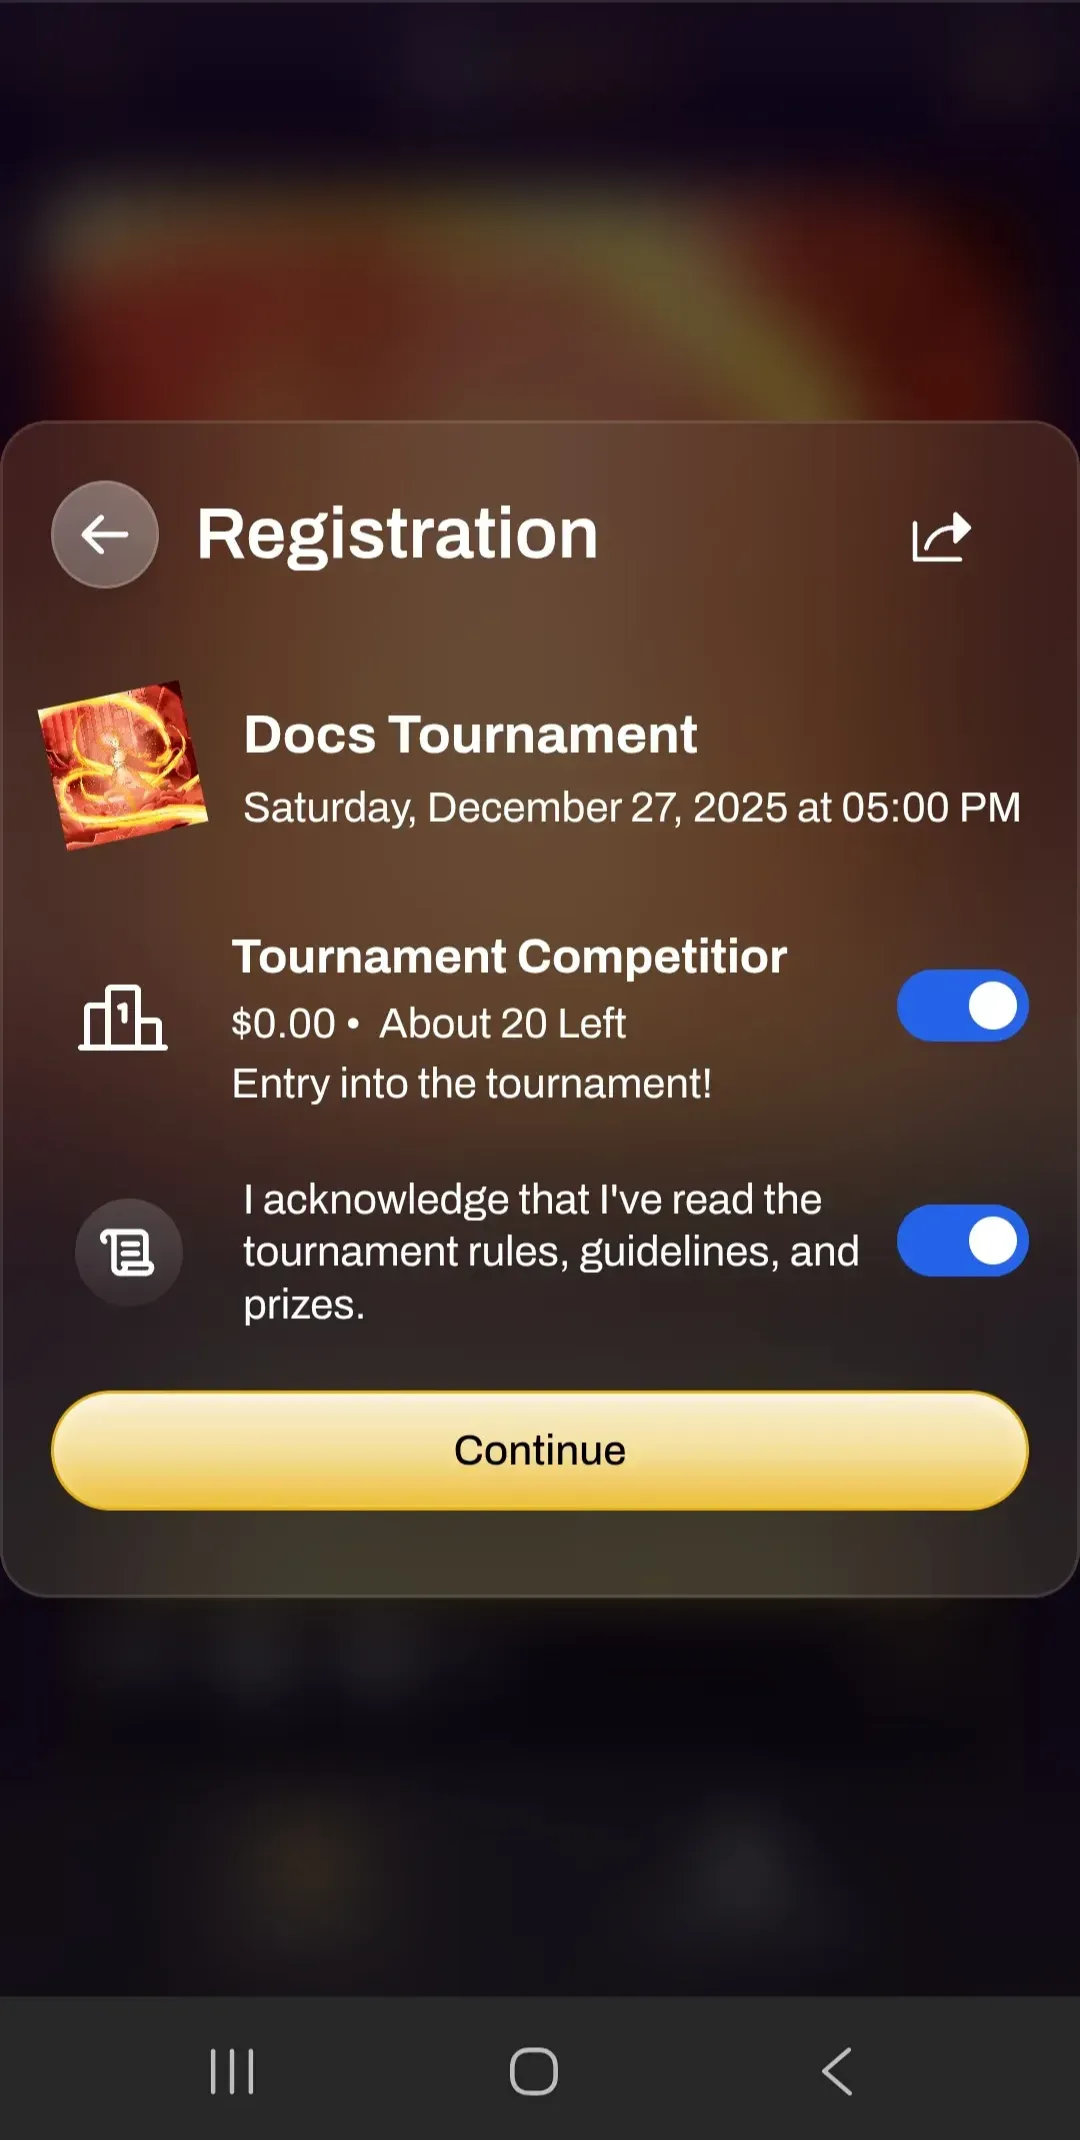
Players Joining Your Tournament
Section titled “Players Joining Your Tournament”After creating the ticket and enabling it, players will be able to join the tournament by navigating to the event page and selecting Join Event. In the case of a paid ticket, they will be taken to a checkout session to complete the payment to obtain their ticket.
Checking Players In
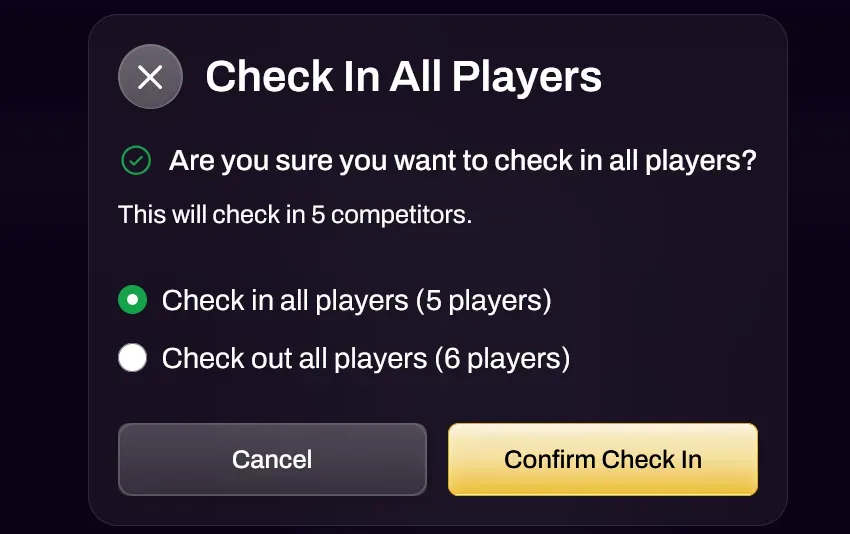
Section titled “Checking Players In”A player will need to be checked into the tournament in order for them to be included in Swiss pairings or bracket generation. Players can check in by themselves in their Competition tab of the event. An organizer can also manually check them in from the Tournament Dashboard under the Competitors tab.
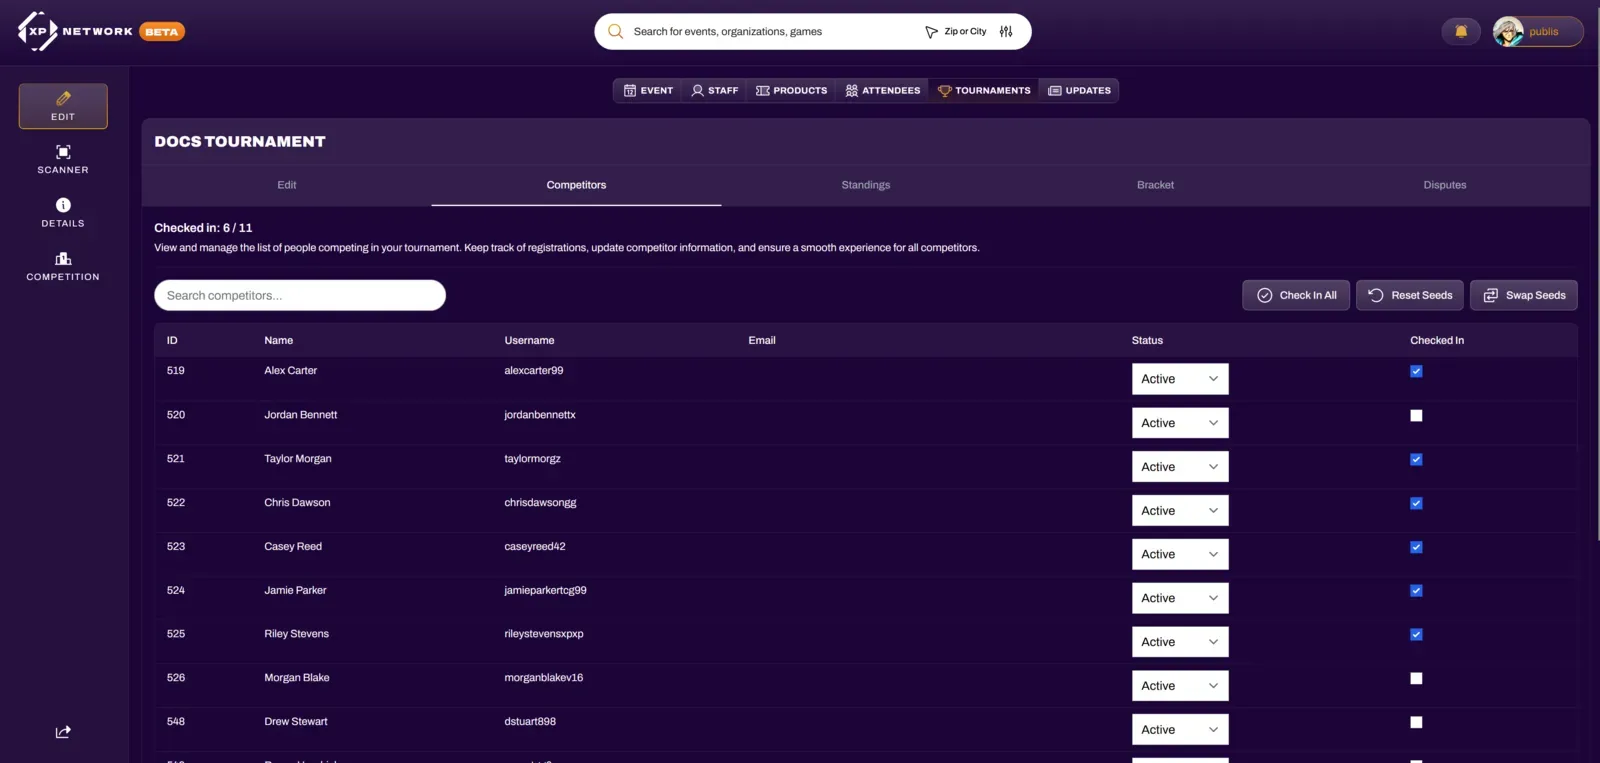
Check In All: This button gives the ability to Check In or Check Out all players.
Reset Seeds: Used for Elimination tournaments to assign seeding. This button must be pressed before creating the initial bracket. Swiss tournaments do not use this button.
Swap Seeds: Used for Elimination tournaments to manually assign seeding and customize matchups. Swiss tournaments do not use this button.
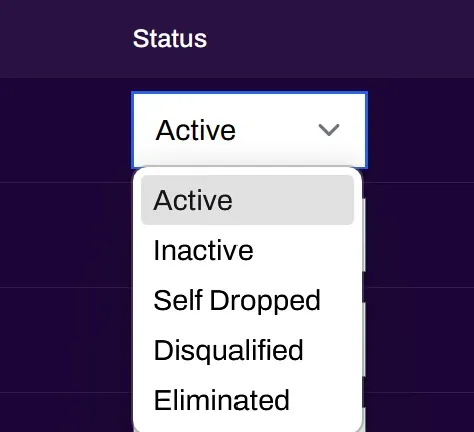
Player Status
Section titled “Player Status”You can change the player status from the Competitors tab.
Active: Default status, player is active in the tournament.
Inactive: Player is inactive in the tournament and will not be included in matches.
Self Dropped: Player has dropped from the tournament.
Disqualified: Removes the player from the tournament and marks them as disqualified.
Eliminated: Player has been eliminated from the tournament.
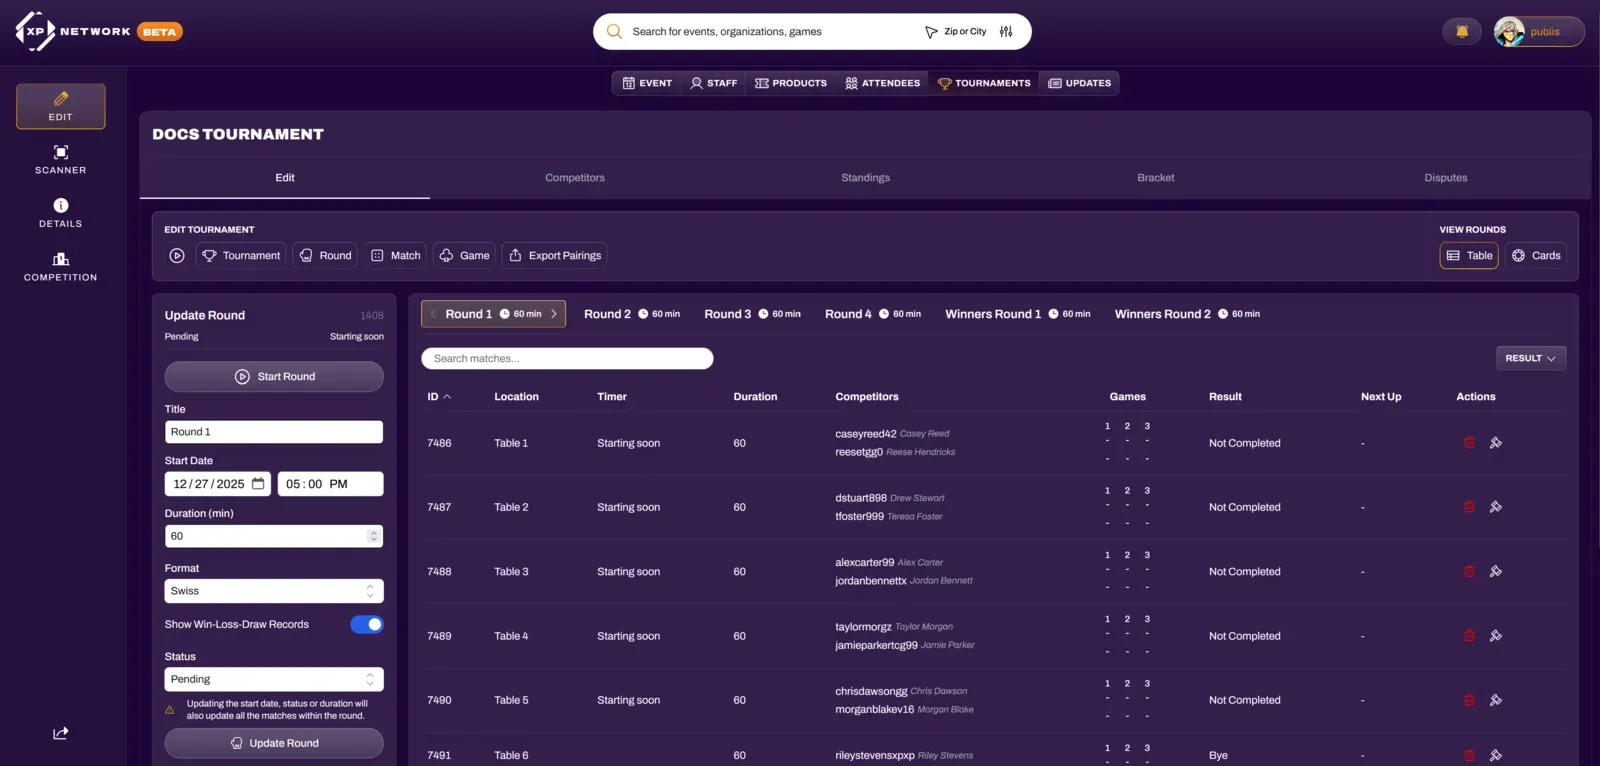
Starting the Tournament
Section titled “Starting the Tournament”After all players are checked in, confirm the number of players is correct in the tournament options. There will also be some additional info like Recommended Rounds, Matches Per Round, Games Per Match, and more. Organizers are able to edit the number of Rounds and games per match after the tournament has started.
Duration (minutes): This will set the default timer for each round.
Time Between Rounds (minutes): This can be used as timed breaks in between rounds. This field is optional and can be ignored if the organizer plans to start rounds immediately after the previous round has ended.
Start Date: Defaults to the tournament start date set when creating the tournament.
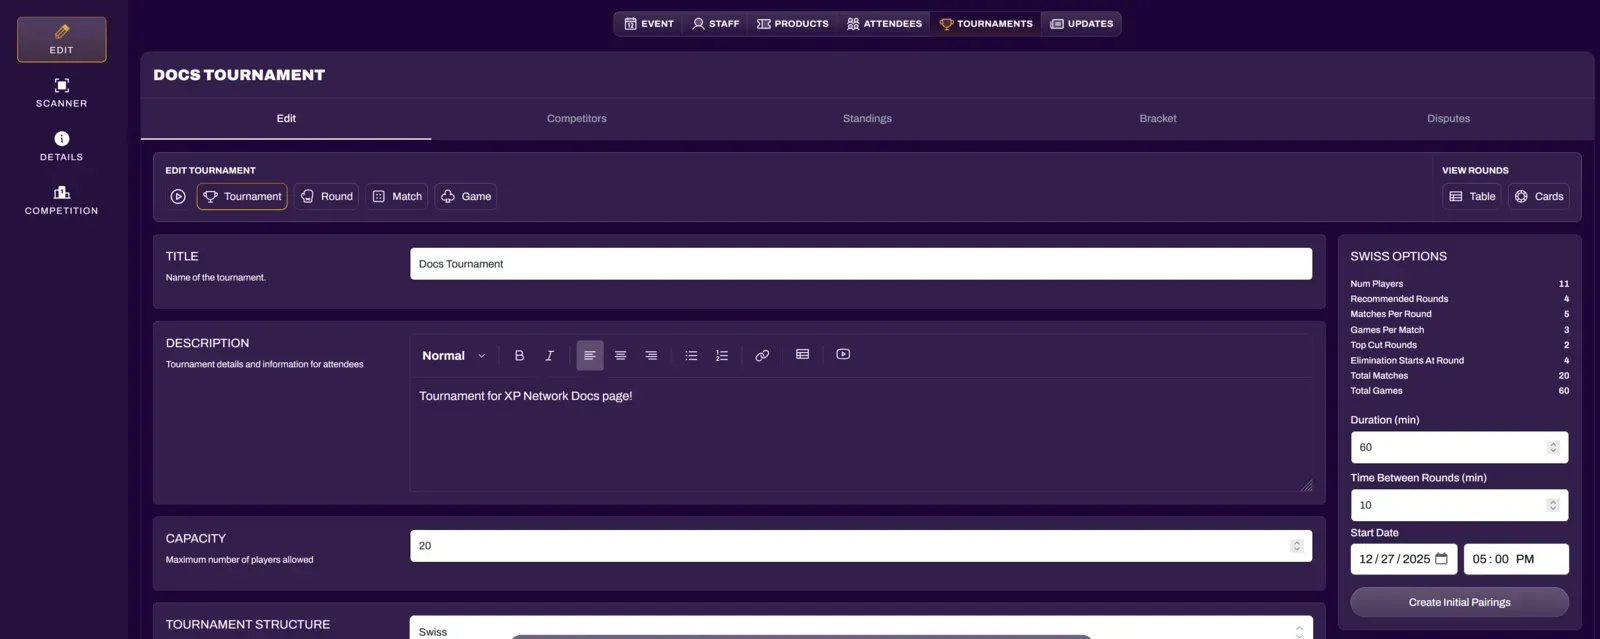
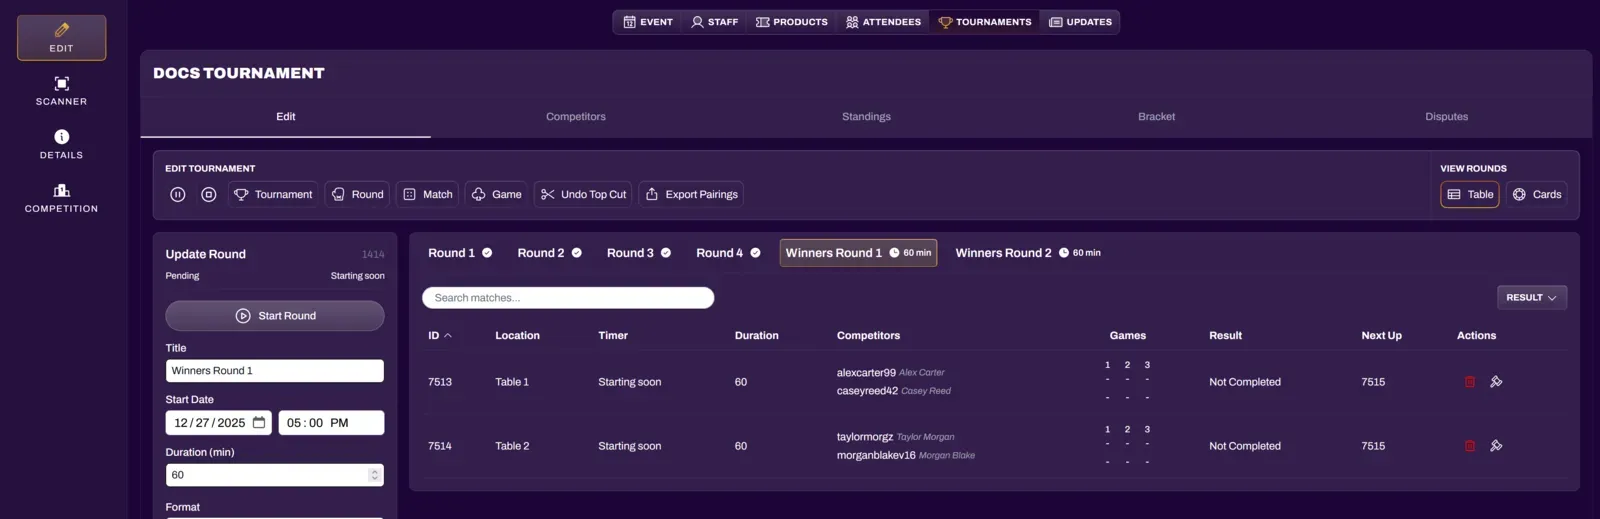
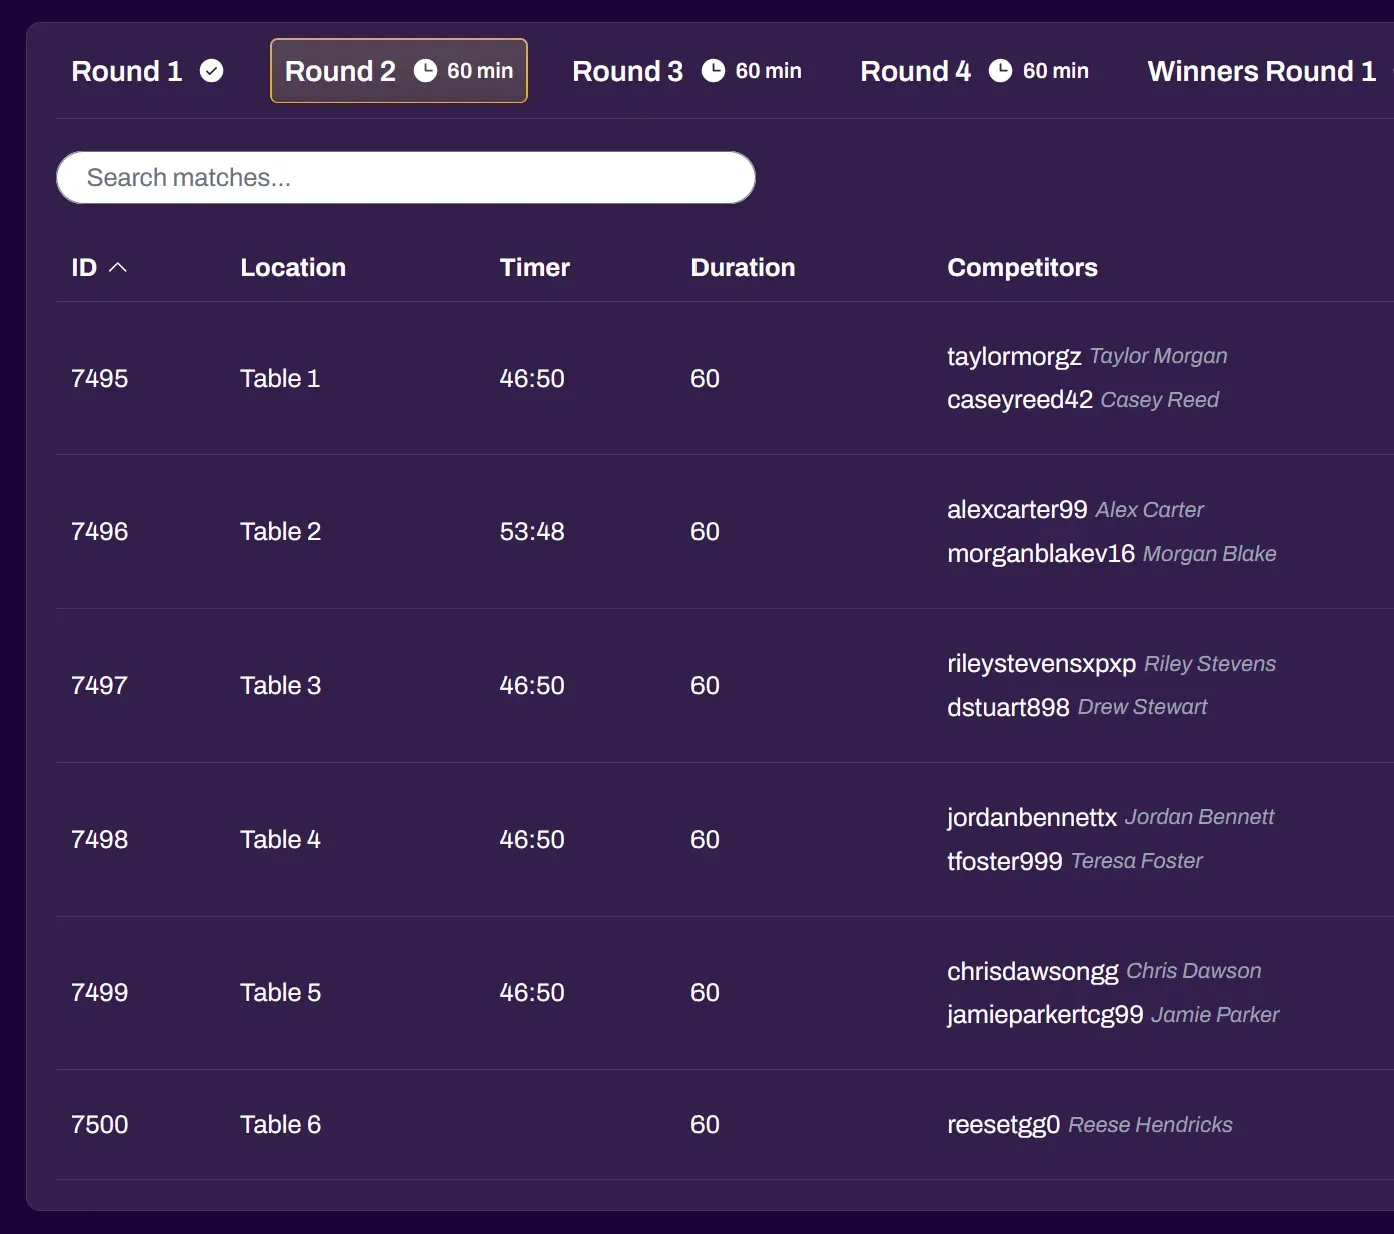
Select the Play button under Edit Tournament to start the tournament. Players will receive a notification that the tournament has started. Then select Create Initial Pairings which will take you to the Round View and show the pairings. Players will receive a notification that Round 1 pairings have been created. Selecting that notification will take them to their Competition tab which will show their Table Number and opponent’s username.
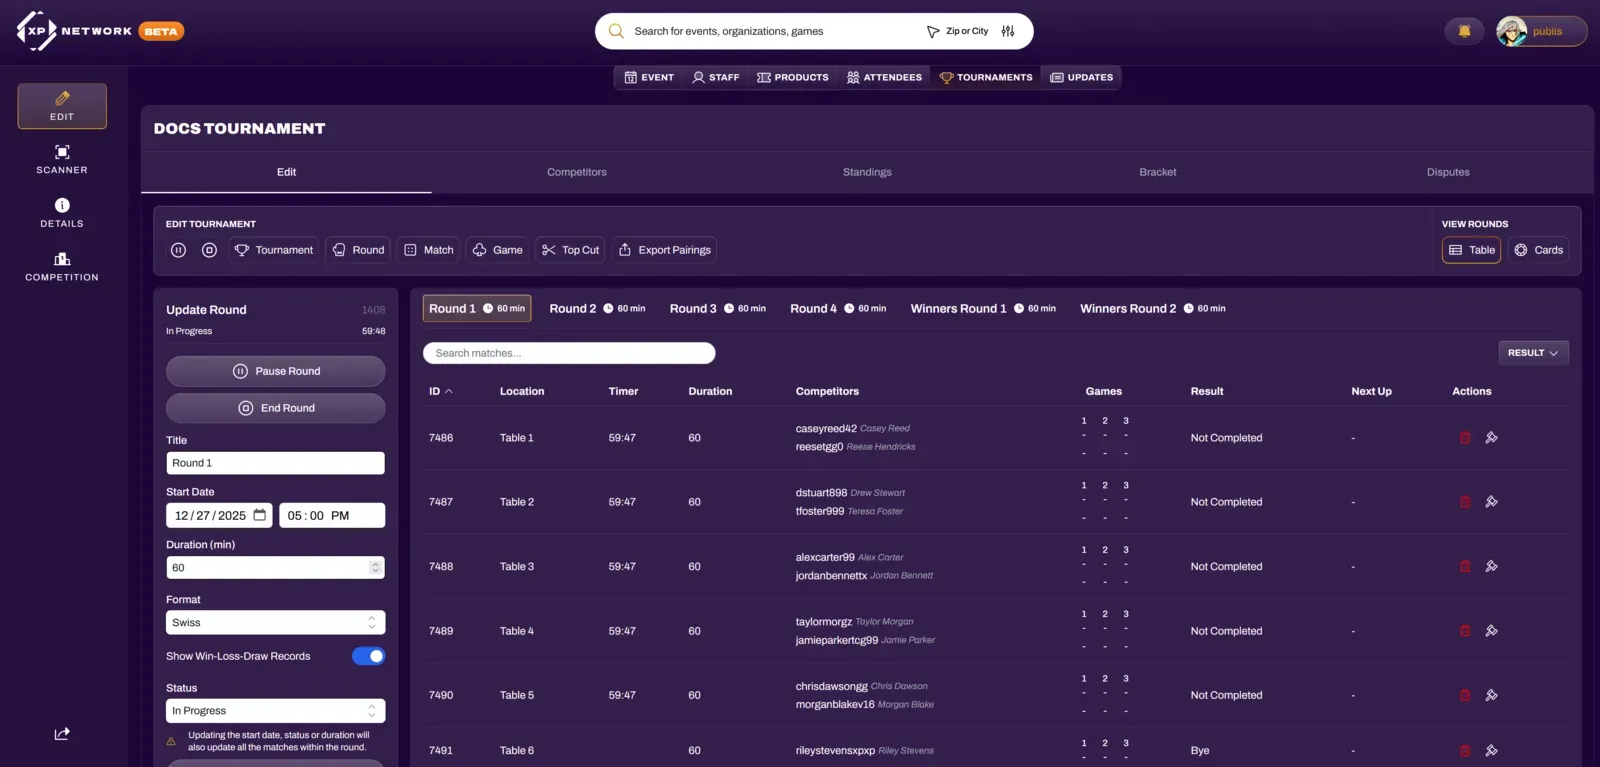
Starting Rounds
Section titled “Starting Rounds”Selecting Start Round will start the Round Timer and send a notification to all players that the round has started. Players can then begin playing their matches. Players are able to report from their side, but an event organizer can submit scores for them.
Reporting Matches
Section titled “Reporting Matches”To report matches as an organizer, select individual games inside of the match. This will bring up the Update Game window where you can enter Win and Loss for the players of that game. Do this for all required games and the Match Result will change to Completed.

To report a Double Loss for a match in the case of game rules or unsportsmanlike conduct, select the Match you wish to issue a Double Loss to, and change the Match Result to a Double Loss.
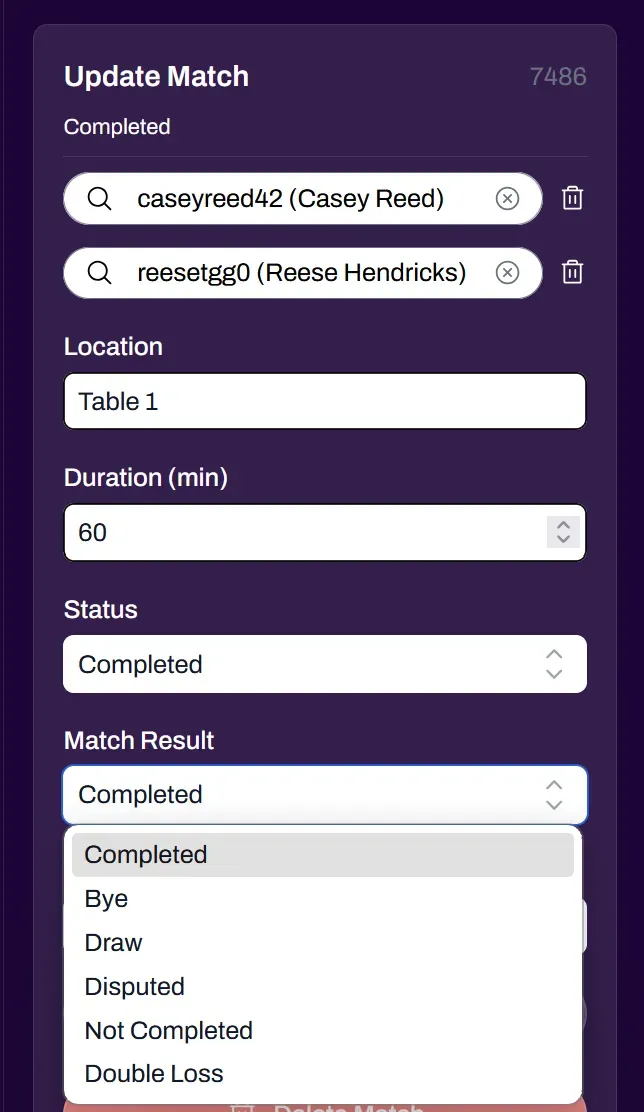
You are also able to swap players at tables through the Update Match window.
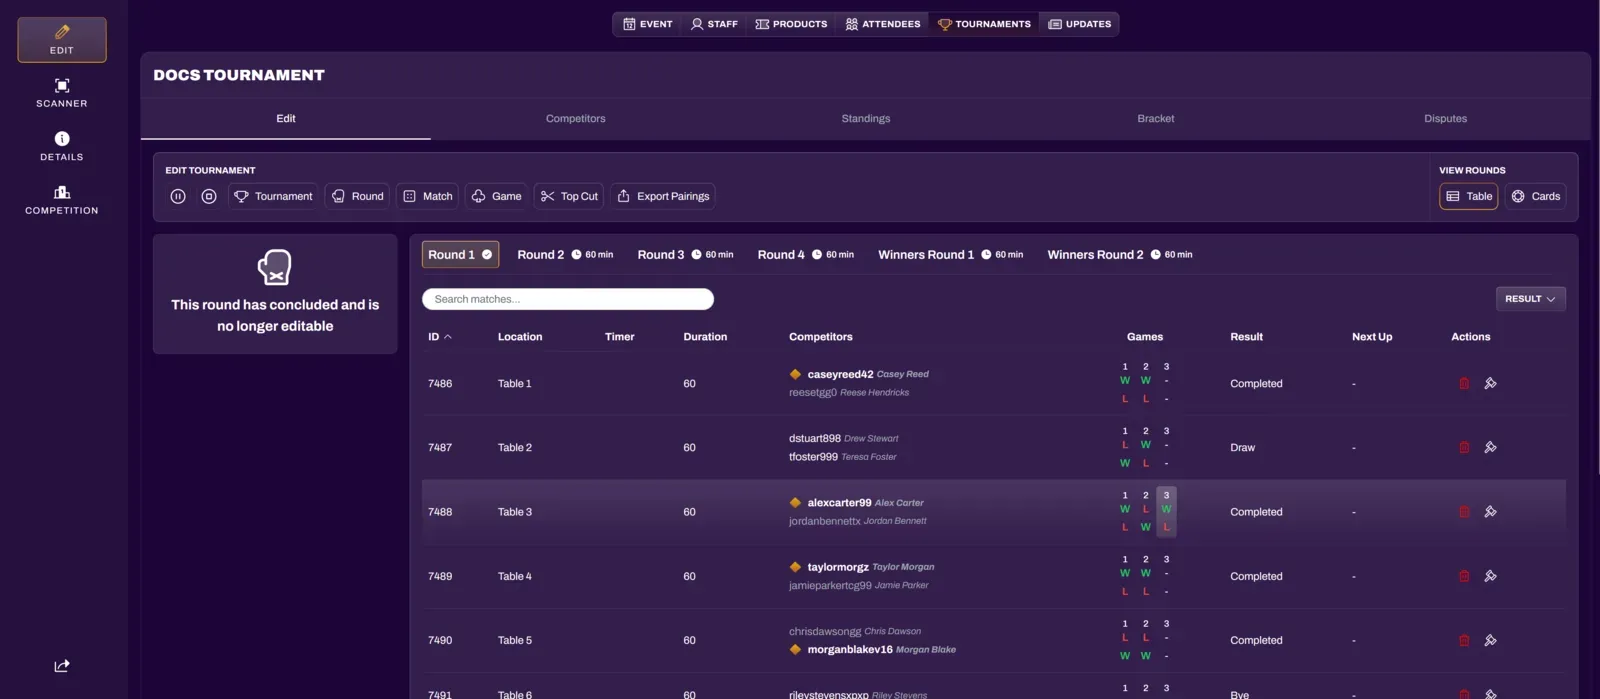
After all matches are complete, the Round will automatically end. You can review the results before proceeding to the next Round and generate the pairings for that round.
Continue repeating for all rounds until the tournament is over.
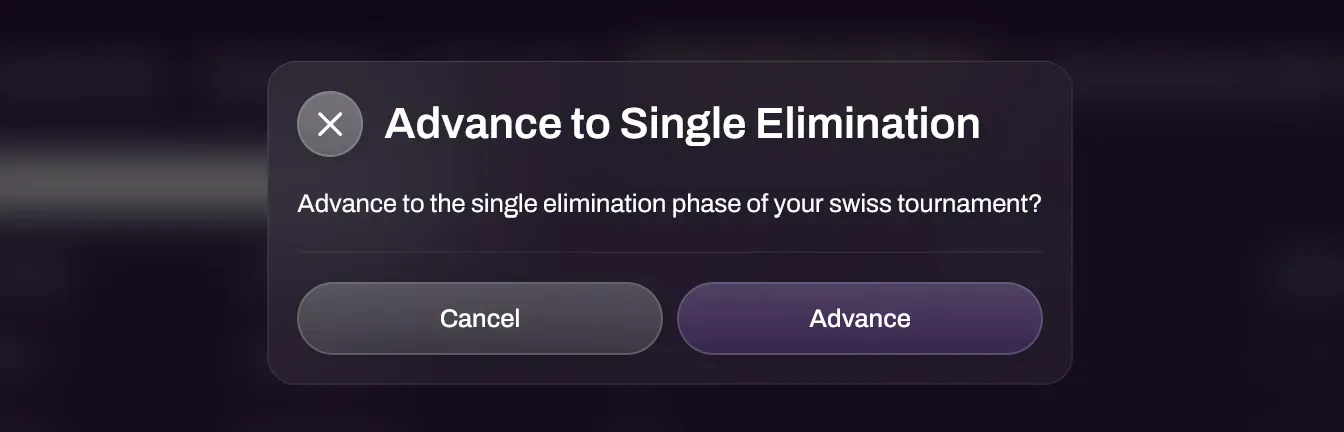
Top Cuts (Swiss tournaments)
Section titled “Top Cuts (Swiss tournaments)”After Swiss rounds are completed, select the Top Cut button to proceed to the single elimination bracket. The system will take the Top X players (X equals the Top Cut amount you set when creating the tournament) from the last round’s standings and seed them traditionally (1v8, 2v7, and so on) into a single elimination bracket. If needed, you are able to customize player positions in the bracket just as you can change players at tables in Swiss rounds.
Top Cut rounds are run just like any other round. You are able to change the Timer if needed through the Update Round window before Starting the round.
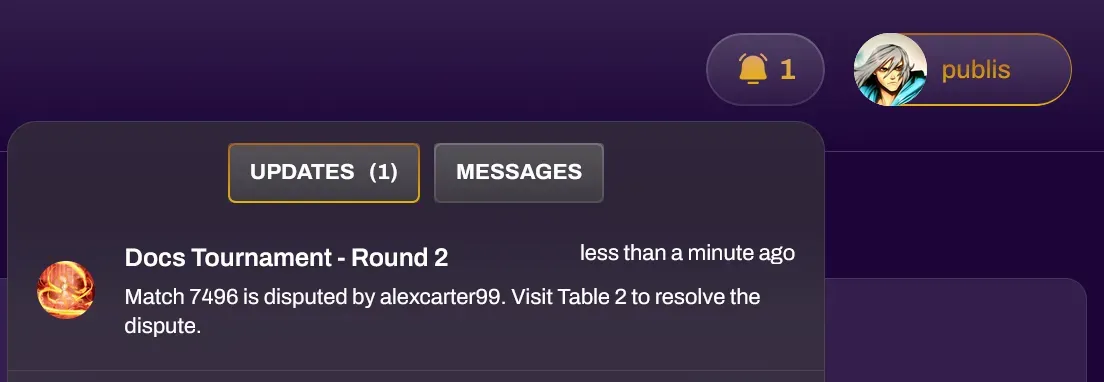
Judge Dashboard (Disputes)
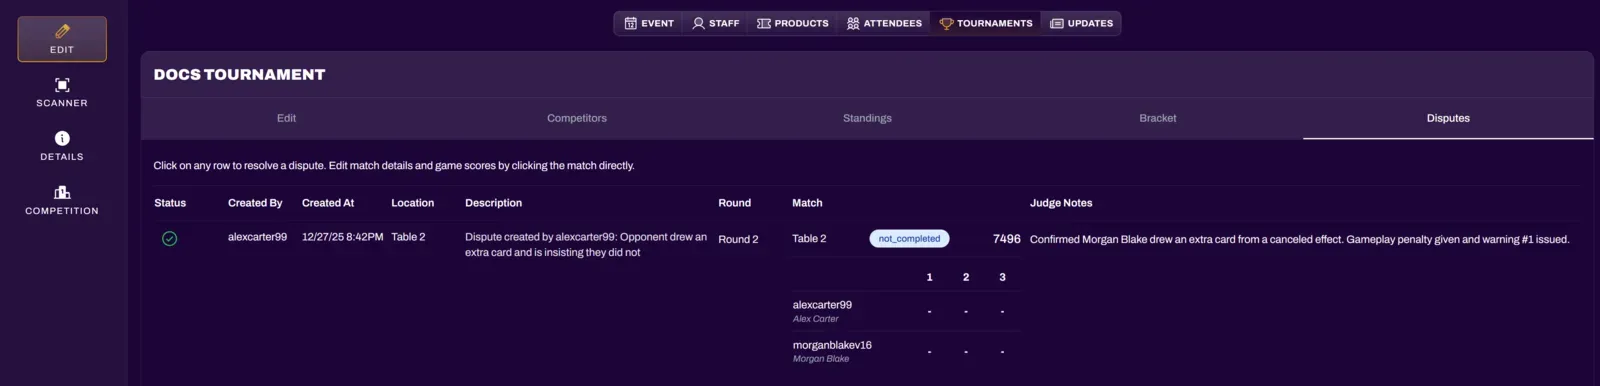
Section titled “Judge Dashboard (Disputes)”Organizers and Judges will be notified of any disputes through the notification bell. These disputes can include incorrect match reporting and judge calls. Any judge calls from players will appear in the Disputes tab along with any notes they may have written.
A disputed match will have its individual match timer paused. Resolving the dispute will unpause their match timer, giving them an accurate time extension to how many seconds/minutes were lost from the judge call.
Selecting the notification will bring you to the Disputes tab, or you can navigate to the Disputes tab regularly through the tournament dashboard.
You will be able to see who created the dispute, the timestamp, table number, and additional notes provided by the player.
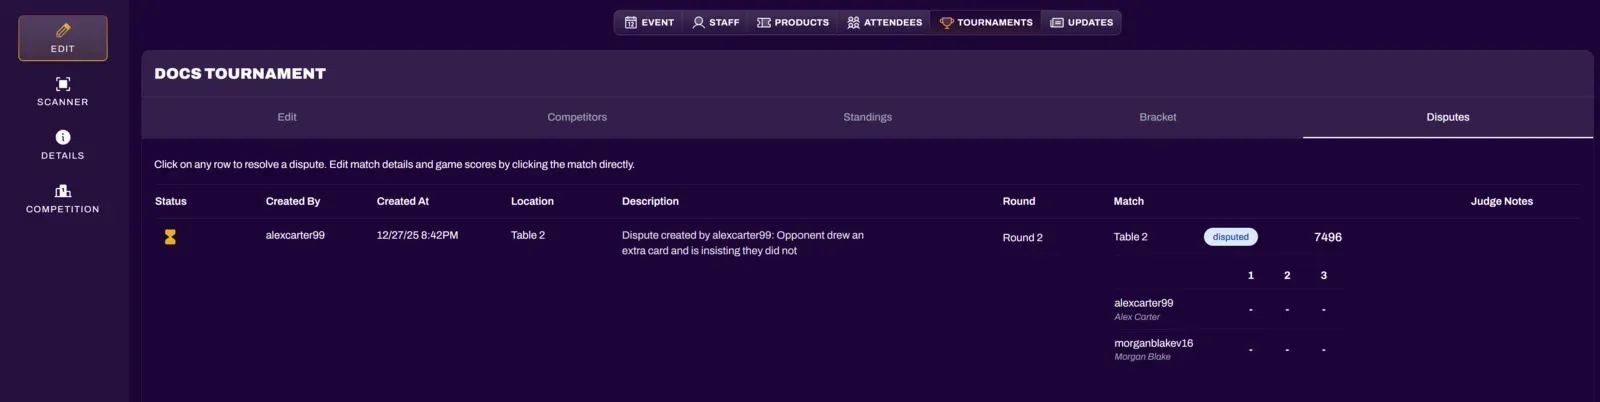
Selecting the dispute will bring up a Resolve Dispute window. You can write any Judge Notes you would like to appear on the Judge Dashboard for any other judges or organizers to reference.
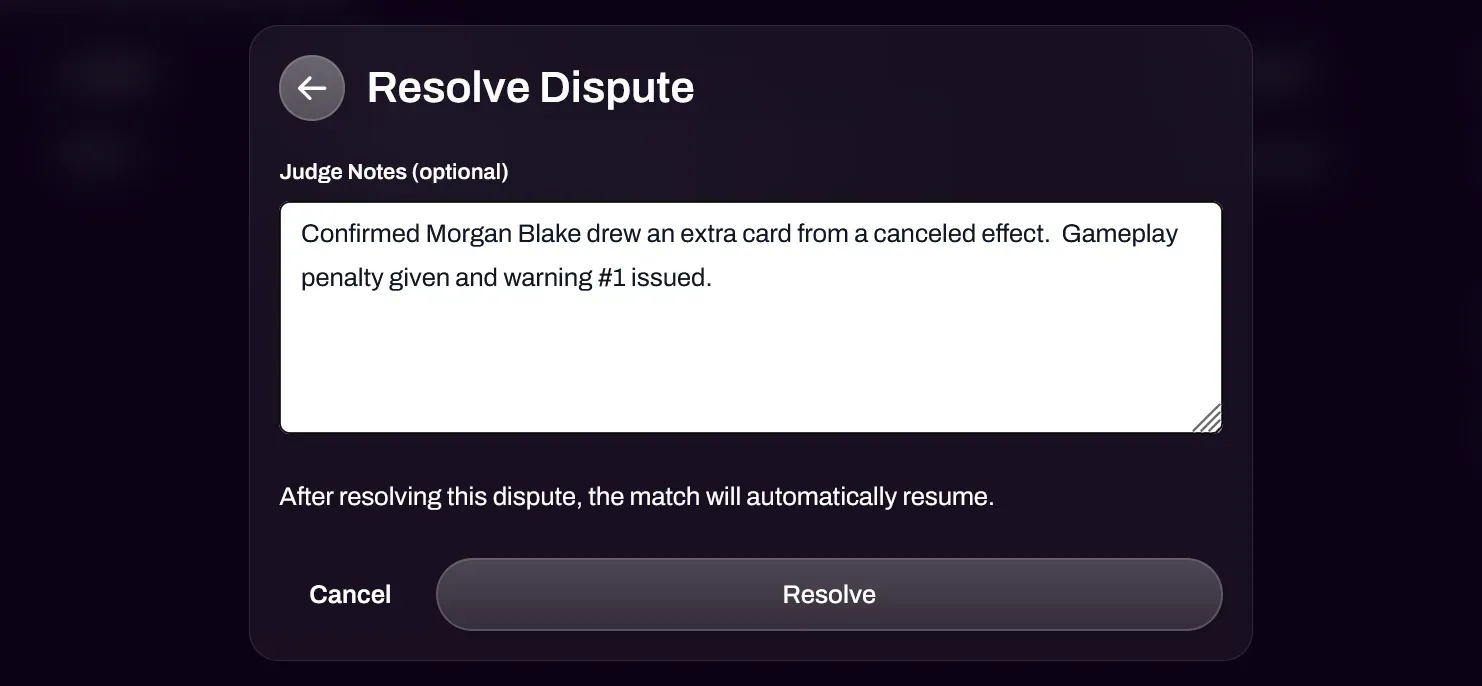
Resolving the dispute will unpause the players individual match timer, giving them an accurate time extension. The judge notes will also be added to the dispute.
You can view the time extension of the disputed match through the Round View.
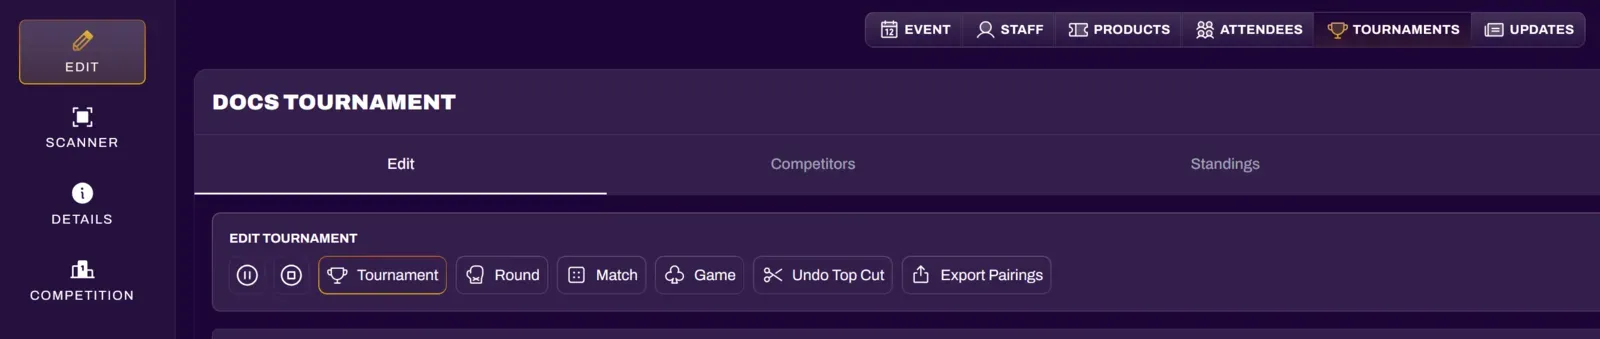
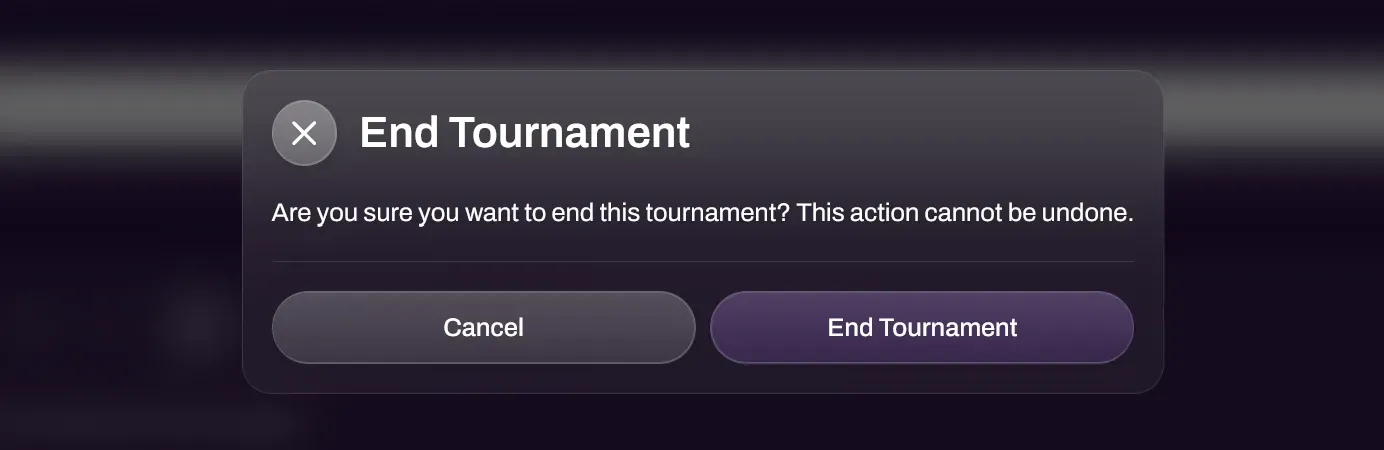
Ending the Tournament
Section titled “Ending the Tournament”To end a tournament, select the Stop icon next to the Pause icon under the Edit Tournament bar. This will give a prompt to end the tournament. All players will receive a notification that the tournament has ended.